Hellenbrand H-150 Series Water System User Manual


35
SERVICE INSTRUCTIONS
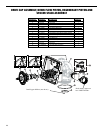
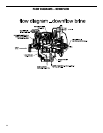
Drive Assembly
Remove the valve cover to access the drive assembly.

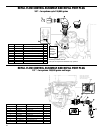
PC board prior to disconnecting the motor or water meter
-




PC Board Replacement

bracket but it is not recommended. Do not attempt to


drive bracket, unplug the power, water meter and motor


the PC board. The drive bracket has two plastic pins that




under the middle latch, weave the power and water meter
wires into the holders and reconnect the motor, water
meter and power plugs.
Drive Bracket Replacement
The drive bracket must be removed to access the drive


to remove the drive bracket. To remove the drive bracket



-



to disengage the notches.




to let the threaded piston rod pass through the hole in the



helps the drive gears mesh with the drive cap assembly.
The drive bracket is properly seated when it snaps under



the drive bracket and drive back plate, or the gear is not
engaging the drive cap assembly.
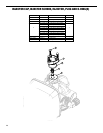
Drive Gear Replacement
To inspect the drive gears, the drive gear cover needs


-


removing the motor or the PC board.) The drive gear
cover is held in place on the drive bracket by three clips.


push in and down on the large clip on the drive gear cover.


Replace broken or damaged drive gears. Do not lubricate


pulse counting.



gear cover slips easily into place.
Drive Motor Replacement




right and hold. Rotate the motor at least a 1/4 turn in ei-

gently pulling on the wire connectors to remove the motor.
Pulling directly on the wires without rotating the motor may


motor or the gears. To reinstall the motor, move the
spring clip loop to the right and hold. Gently turn the mo-
tor while inserting so that the gear on the motor meshes
with the gears under the drive gear cover. Release the
spring clip loop and continue to rotate the motor until the

small plastic bulge inside the drive bracket motor retainer.
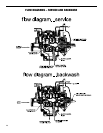

-


power plug.
-


plug back in. This resets the electronics and establishes


valve to the service position.