


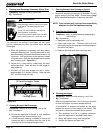

Page 4
7001-142D
September 1, 2008
Santa Fe Pellet Stove
R
R
R
NOTE: Combustion Blower Gasket is also required. Sold
separately under Part Number 240-0812.
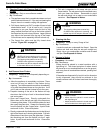
a. Turn down the thermostat, let appliance completely cool
and then unplug appliance before servicing.
b. Remove the 2 side curtains by removing the 8 screws in
the top and bottom hinges on both sides. Note that the
right side curtain has a caution label on the inside, the
left side curtain does not.
c. Disconnect vacuum hose and red and orange wires from
the vacuum switch. Disconnect the white and blue wires
from the exhaust blower.
d.
Remove the upper rear screen from the appliance by
removing 2 screws at the top, 1 in the center and 2 screws
on the sides at the top. Inside the hopper is a metal strip
that the top 2 screws penetrate. Be careful not to drop the
metal strip into the hopper. See Figure 33.3 on page 33.
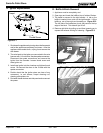
e. Remove the right lower side curtain by releasing bracket
from attachment holes in the back and then swing it to
the front and lift off of the appliance. See Figure 33.1
on page 33.
f. Remove the lower rear screen and lay at, leaving all
wires still attached.
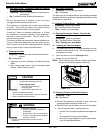
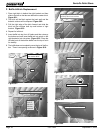
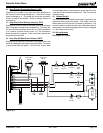
g. Remove 2 screws at each end of the the convection
cover and then slide the hooks to the left and remove
with the exhaust blower still attached. Figure 34.1.
h. Remove the combustion blower gasket and discard.
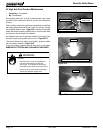
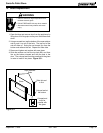
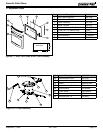
i. Disconnect wires from snap disc #2. Figure 34.2.
j. Loosen wing nut to relieve the pressure on snap disc
from the bracket. The shaded area of the snap disc is
inserted into a hole in the feed tube. NOTE: You may
need pliers to start the wing nut. Figure 34.3.
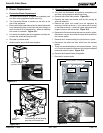
k.
When bracket is loose enough, rotate the bracket coun-
terclockwise and away from feed tube. Figure 34.4.
Convection Cover
Hook
Hook
Remove 2 screws at each end
Figure 34.1
l. Reach behind bracket and remove old snap disc.
Install new snap disc and rotate back to original posi-
tion ensuring the snap disc is inserted in the hole in
the feed tube. Tighten the wing nut and re-attach the
wires to the new snap disc.
m. Install new combustion blower gasket and blower.
Align hooks on the convection cover with slots and
slide to the right to snap in place. Re-connect the
white & blue wires to the exhaust blower.
n. Install the lower rear screen and then the upper rear
screen. Re-connect the vacuum switch wires and
vacuum hose.
o. Re-install the lower side curtains by placing them on
the front studs rst, ex the curtain and snap brackets
into attachment holes in the back.
Wing Nut
Bracket
Disconnect
Wires
Figure 34.2
Figure 34.3
Loosen Wing
Nut to relieve
pressure
Shaded area
inserted in hole in
Feed Tube
Rotate bracket counterclockwise
once pressure is relieved
With bracket in rotated position,
reach behind bracket and remove
and replace Snap Disc
3. Snap Disc #2 Replacement
Figure 34.4