


Heat & Glo • Paloma • 7031-220 Rev. P • 10/08 35
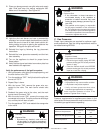
Figure 8.11
Figure 8.12
Figure 8.10
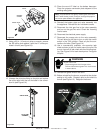
Figure 8.9
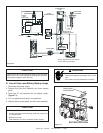
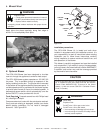
E. Top to Rear Vent Conversion
Kit Contents: Top cover (no hole); Back panel (with hole).
Tools Required: Power drill; #2 Phillips bit; 5/32 in. (4 mm)
Allen wrench; 5/8 in. (16 mm) open end wrench; high-temp
silicone sealant (optional).
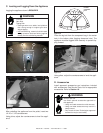
1. Remove the front door assembly by lifting it off of the
spring-loaded latches on top of the appliance. Remove
the inner glass door by disengaging the spring-loaded
latches at the bottom of the appliance and lifting it off
of the two spring loaded latches at the top of the appli-
ance.
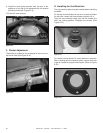
2. Remove the top plate with hole and discard. (Figure 8.8).
Note: When installing this appliance in a rear vent confi gura-
tion with no vertical rise, a Snorkel Kit must be used.
Figure 8.8
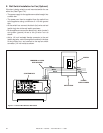
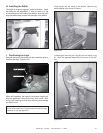
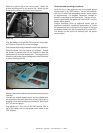
3. Remove and retain the Allen head screws that hold the
solid back panel in place. (Figure 8.9) Remove and
discard the solid back panel.
4. Remove the four screws from the DV adapter collar.
(Figure 8.10) Set aside DV adapter collar and screws.
5. Remove the inner extension starter collar (Shown in
Figure 8.10) and set aside.
PILOT ASSEMBLY
PILOT ASSEMBLY
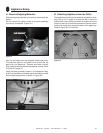
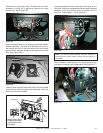
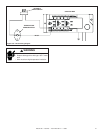
6. Remove the four screws from the cover plate on rear
of appliance. Retain screws. (see Figure 8.11).
INNER EXTENSION COLLAR
INNER EXTENSION COLLAR
DV ADAPTER
DV ADAPTER
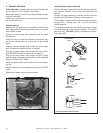
7. Install the outer collar with gasket to the rear of appli-
ance with screws previously removed. Install the inner
extension starter collar. (Figure 8.12).
8. Install the new back panel (with hole) to the rear of
appliance. Replace the allen head screws removed in
Step 3 to hold the back panel in place. (Figure 8.12).