


Heat & Glo • Paloma • 7031-220 Rev. P • 10/08 19
H. Cathedral Ceiling
1. Follow installation Steps 1 and 2 under vertical instal-
lation section, page 16.
2. Remove shingles or other roof covering as necessary
to cut the rectangular hole for the support box. Cut
the hole 1/8 in. (3 mm) larger than the support box
outline.
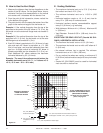
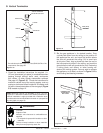
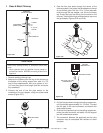
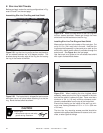
3. Lower the support box through the hole in the roof
until the bottom of the support box protrudes at least 2
in. (51 mm) below the ceiling (Figure 5.17). Align the
support box both vertically and horizontally with a level.
Temporarily tack the support box in place through the
inside walls and into the roof sheathing.
LEVEL
CATHEDRAL CEILING
SUPPORT BOX
2 in. (51 mm) MIN. BELOW
FINISHED CEILING
CUT HOLE 1/8 in. (3 mm)
GREATER IN SIZE THAN
PATTERN OF SUPPORT
BOX AS IT IS PROJECTED
ONTO ROOF LINE
Figure 5.17
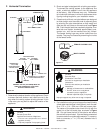
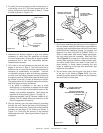
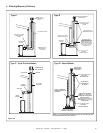
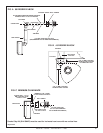
Figure 5.18
4. Using tin snips, cut the support box from the top corners
down to the roofline, and fold the resulting flaps over
the roof sheathing (Figure 5.18). Before nailing it to the
roof, run a bead of non-hardening mastic around the
top edges of the support box to make a seal between it
and the roof. Clean out any combustible material from
inside the support box.
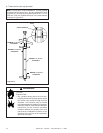
5. Assemble the desired lengths of pipe and elbows
necessary to reach from the appliance up through
the round support box. Ensure that all pipe and elbow
connections are in their fully twist-locked position.
Assemble as instructed.
6. Place the support clamp (provided with the support
box) inside the support box (at the bottom), and secure
to the pipe section. The clamp allows the support box
to support the weight of the pipe sections. Continue to
add pipe sections until you are above the roofline.
7. Complete the cathedral ceiling installation by following
the same procedures outlined in steps 7 through 9 for
vertical installations, pages 17-18.
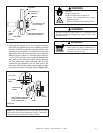
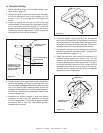
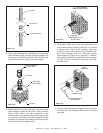
8. Install the black trim collar around the outside of the
cathedral ceiling support box (Figure 5.19). The two
pieces of the trim collar slide over one another to allow
for easy adjustment around the support box. Using the
six screws provided, secure the four corners and the
overlapping sections of the trim collar to the ceiling.
You may want to predrill the holes for the overlapped
sections for ease of installation.
CATHEDRAL CEILING
SUPPORT BOX
TRIM COLLAR
SCREWS
Figure 5.19