


Heat & Glo • Paloma • 7031-220 Rev. P • 10/0826
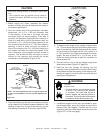
Any damaged valve components should not be installed.
If a valve or regulator has been dropped or appears to
have been modifi ed, the valve or regulator should not be
installed.
Tools required: #2 Phillips head screwdriver; Power drill
(a 90° drill is helpful); Tamper-resistant Torx Driver TR20;
#2 Phillips bit; 5/32 in. (4 mm) Allen wrench; 3/8 in. (10
mm) open end wrench.
Coversion component list:
• LP Burner orifi ce: #52DMS
• Pilot orifi ce
• Gas valve regulator
• Propane conversion plate
• LP label
B. Converting to LP Gas
5. Remove the inlet gas line from valve connection.
6. Remove the six hold down screws from the fi rebox
bottom plate.
7. Disconnect the orange and green wires from the con-
trol valve and lift the bottom plate and valve assembly
from the appliance.
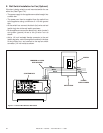
8. Remove the orange and white wires from the ignition
module which is located on the control panel (see
Figure 7.1 on page 31).
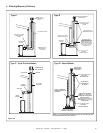
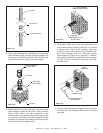
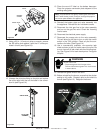
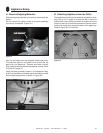
9. Using a #20 tamper-proof Torx, remove the regulator
and rubber gasket on face of valve (see Figure 6.2).
Discard both the regulator and gasket.
10. Install the new regulator along with the new rubber
gasket included in the conversion kit (see Figure 6.2).
A. Fuel Conversions
Before making gas connections ensure that appliance be-
ing installed is compatible with the available gas type.
Any natural or propane gas conversions necessary to
meet the appliance and locality needs must be made by
a qualifi ed technician using Hearth & Home Technologies
specifi ed and approved parts.
6
6
Gas Information
Fire Risk.
Explosion Risk.
• If the information in these instructions is not
followed exactly, a fi re, explosion or produc-
tion of carbon monoxide may result causing
property damage, personal injury or loss of
life. The qualifi ed service agency is respon-
sible for the proper installation of this kit. The
installation is not proper and complete until
all the operation of the converted appliance
is checked as specifi ed in the manufactur-
er's instructions supplied with the kit.
• This conversion kit shall be installed by a
qualifi ed service agency in accordance with
the manufacturer's instructions and all appli-
cable codes and requirements of the authority
having jurisdiction.
(In the Commonwealth of
Massachusetts installation must be performed
by a licensed plumber or gas fi tter.)
WARNING
The gas supply shall be shut off prior to disconnecting the
electrical power before proceeding with the conversion.
CAUTION
PROCEDURE FOR CONVERSION:
1
.
Turn off gas to appliance by closing the inlet line
valve.
2. Turn off power to the module and valve.
3. Remove the front door assembly, inner glass door
assembly and logs.
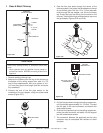
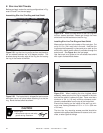
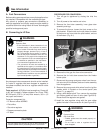
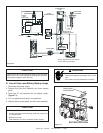
4. To remove the burner, loosen the front screw on the
pilot bracket. Slide the tab on the left side at the back
of the burner out from under the pilot bracket, and out
of the fi rebox. (Fig. 6.1)
Figure 6.1
TAB ON BACK
TAB ON BACK
OF BURNER
OF BURNER
WARNING
Fire Risk.
Explosion Risk.
Gas Leak Risk.
• Rubber gasket must be seated properly on
valve face.
• Do no install a valve or regulator that has
been dropped.