


Heat & Glo • Paloma • 7031-220 Rev. P • 10/08 27
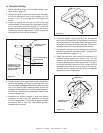
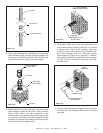
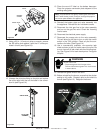
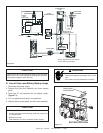
RUBBER
GASKET
REGULATOR
VALVE
Figure 6.2
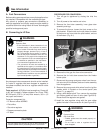
13. Place the round LP label on the bottom base pan.
Place the propane conversion plate adjacent to the
existing rating plate.
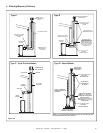
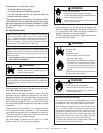
Figure 6.4
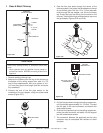
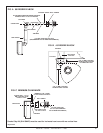
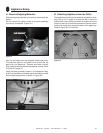
ORIFICE SPUD
PILOT TUBE
ASSEMBLY
11. Using a 3/8 in. (10 mm) nut driver or wrench, remove
the NG orifi ce and replace it with the LP orifi ce pro-
vided in this kit (see Figure 6.3).
Note: The qualifi ed service agency installing this conversion
MUST enter the day, month, and year, and sign the propane
conversion plate added to the appliance.
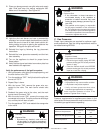
12. Unscrew the pilot tube fi tting on the pilot and replace
the orifi ce spud with the one included in the conver-
sion kit (see Figure 6.4).
Figure 6.3
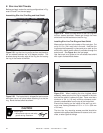
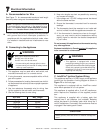
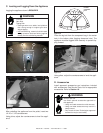
19. Reinstall the green wire on the valve.
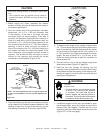
20. Before reinstalling the burner, ensure that the shutter
setting is fully open. Reattach pilot to pilot shield to
burner (see Figure 6.5). Retighten the screw.
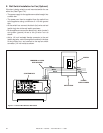
14. Reinstall the bottom plate and valve assembly into
the appliance. Reinstall the six hold down screws.
15. Reconnect the inlet gas line to the valve assembly
and turn on the gas line valve. Check the incoming
line for leaks.
16. Reconnect the electrical power supply.
17. Reconnect the orange wire to the valve assembly.
This will allow for the pilot to turn on with the control
switch in the "ON" position. Check all pilot line con-
nections for leaks. (See Figure 6.4)
18. Use a commercially available, non-corrosive leak
check solution to test for leaks around the pilot. Be
sure to rinse off all leak check solution following test-
ing. See Figure 6.4 for leak check points. Extinguish
the pilot.
Shock or burn risk.
• Disconnect green wire from gas valve.
Failure to disconnect green wire could result
in severe burns.
WARNING
Figure 6.5
REATTACH
REATTACH
PILOT SHIELD
PILOT SHIELD