


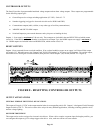
Page 11
LCD CONSOLE HOOKUP
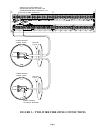
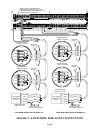
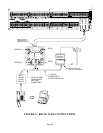
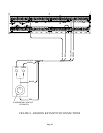
1. 8 LCD Consoles (Models 11A00-1, 11A00-2, 11A00-9, and 15A00) MAXIMUM per system, subject to power availability.
2. Use 4-conductor 22-gage wire, 1000 feet maximum length. Consoles can be homerun or daisy chained. This length shall be
divided by the total number of consoles at the end of the run. For example, for 8 consoles, the maximum length reduces to
125 feet. All LCD Consoles are connected to the same 4 wires, +12, GND, A, B.
3. The console should be mounted so that the LCD display is at or slightly above eye level. Consoles should be kept out of the
reach of young children. A good height is approximately 58 inches from the floor to the bottom of the console enclosure.
4. Remove console face from back plate (slots on bottom of console will release back plate, use a screwdriver). Mount the back
plate to the wall. Mounting holes are designed to fit on a single or double gang box, or directly to the wall. Pull the wires
from the wall through the opening in the back plate. Splice the wires to the supplied cable. Connect the cable to the
connector on the console board (J1). Snap the console face on to the back plate. Remove protective film from the LCD lens.
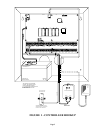
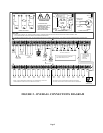
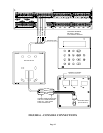
5. Refer to FIGURE 6 (CONSOLE CONNECTIONS) for this configuration.
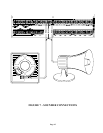
CONSOLE SETUP
The console has different operating options that can be setup from the console to the user's preference. If more than one console
is being used, it is required that you give each console a different address. You can change the address of a console through the
console setup mode.
To enter the console setup mode, simultaneously press and hold the 4 and up arrow (!) for approximately 1 second. The console
will beep 5 times and enter the setup mode. The top line of the display will indicate what you are doing, followed by the current
setting. The bottom line will show a menu of your options. To the lower right corner of the display is the direction arrow(s).
Where possible, the up (
↑), down (↓), and two-headed (↕) arrow characters are shown on the console display to indicate which
arrow keys may be pressed at that time. Press the down arrow (") key to advance to the next item. Press the up arrow (!) key to
go back to the previous item.
CONSOLE ADDRESS
If you are installing more than one console, each console must be set to a different address. The default address setting is (1) -
this is adequate if only one console is being used. The choices at the bottom are 1-16. When making your choice, choose an
address between 1-8, then press the # (pound) key.
SOUNDER
If you wish not to hear the beeper in the console for any reason, the sounder option can be turned off. Select (0) for OFF or (1)
for ON, then press the # key.
KEY CLICK
The sounder makes a click every time a key is pressed. This option may also be turned off. Select (0) for OFF or (1) for ON,
then press the # key.
KEY BACKLIGHT
The keys on the console keypad are lit. The keys can be never lit, always lit, or only lit when the LCD display is lit. Select (0)
OFF, (1) for ON, or (2) TIMED, then press the # key.
VIEWING ADJUSTMENT
This option is an adjustment for the viewing angle of the LCD display. This has been set to its best value at the factory, however,
you may wish to tweak it. The display has 20 levels of adjustment. Select (1) for a lower viewing angle, or (2) for a higher
viewing angle.