


4
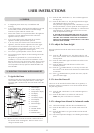
USER INSTRUCTIONS
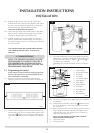
1.1 A competent person must carry out installation and
servicing.
1.2 In all correspondence, please quote the appliance type and
serial number, which can be found on the data badge
located on a plate under the control valve.
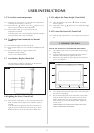
1.3 Ensure that curtains are not positioned above the appliance
and there is at least 300mm between the sides of the
appliance and any curtains.
1.4 If any cracks appear in the glass panel do not use the
appliance until the panel has been replaced.
1.5 If, for any reason, the flue has to be removed from the
appliance, the seals must be replaced in the inner spigot.
1.6 Do not obstruct the flue terminal in any way, i.e. by
planting flowers, trees, shrubs etc in the near vicinity, or by
leaning objects up against the terminal guard.
1.7 Do not use a garden sprinkler or hose near the terminal.
1.8 Do not stand or place objects on the terminal guard as this
will deform it.
This product is guaranteed for 2 years from the date of
installation, as set out in the terms and conditions of sale
between Gazco and your local Gazco dealer. Please consult
with your local Gazco dealer if you have any questions. In
all correspondence always quote the Model Number and
Serial Number.
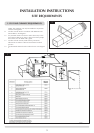
2.1
To ignite the Linea
The Gazco Linea has a fully automatic battery operated gas
control which can be lit using the hand set or touch pad.
The touch pad is located on the lower left hand side of the
appliance.
2.1.1 Before the Linea can be lit the remote control must be in
the manual mode. See diagram 1. Refer to section 2.6 to
change to manual mode.
2. LIGHTING THE LINEA WITH HAND SET
1. GENERAL
2.1.2 Press the ON / OFF button (11). The word ON appears in
the display (4).
2.1.3 Press the SET button (12). The pilot light should now light.
This should take about 10 seconds.
If the pilot fails to light press the ON / OFF button (11) and
then the SET button (12) then repeat the above sequence.
2.1.4 A single flame will appear on the display (1). When this has
stopped flashing, an audible click is heard. You are now
ready to adjust the flame height.
IF THE FIRE IS EXTINGUISHED OR GOES OUT IN USE,
WAIT 3 MINUTES BEFORE ATTEMPTING TO RELIGHT
THE FIRE. THE CONTROL VALVE HAS AN INTERLOCK
DEVICE AND THEREFORE CANNOT BE LIT UNTIL THE 3
MINUTES HAVE ELAPSED.
2.2 To adjust the flame height
Once the pilot has been lit the main burner can be lit and
adjusted.
2.2.1 Press the ( ) UP button (10). The flame symbol (1) will
show one extra flame. This is to indicate the burner is on its
lowest position.
2.2.2 Press the same button again and the burner will be in the
medium position.
2.2.3 Press the button again and the burner will be in the
maximum position.
2.2.4 Press the ( ) DOWN button (13) one step at a time and
this will reduce the burner from maximum to medium then
to minimum.
2.2.5 If the ( ) DOWN button is pressed once more, only the
pilot will remain alight.
2.3 To turn the Linea off
The Linea can be turned off with the flames in any position, ie
minimum, medium or maximum. It can also be turned off from
the pilot only position.
2.3.1 Press the ON / OFF button (11) the word OFF appears in
the display.
2.3.2 Press the SET button (12) and the fire will turn off.
NOTE: The pilot can be left on if so desired
2.4 To change from Manual to Automatic mode
2.4.1 The hand set display will show the word MANUAL (8)
2.4.2 Press the SET button (12) once and the word AUTO will
flash.
2.4.3 Press the SET button (12) again and the word AUTO will
stop flashing.
2.4.4 The room temperature display is now flashing and ready to
be set.
1
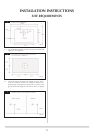
1: Flame display
2: Celsius display
3: Temperature display
4: On display
5: Off display
6: Low battery display
7: Clock display
8: Auto display
9: Manual display
10: UP button
11: ON/OFF button
12: SET button
13: DOWN button
AR1665
1
2
3
10
11
5
6
7
4
8
9
12
13