


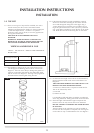
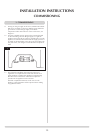
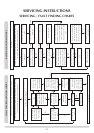

3.3 TOP EXIT - VERTICAL FLUE
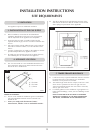
3.3.1 If a vertical only flue system has been purchased refer to
Site Requirements, Diagram 5.
The following areas need careful consideration:-
a) Terminal positions
b) Flue supports
c) Weatherproofing
d) Fire precautions
For all of the above, local and national codes of practice
must be adhered to.
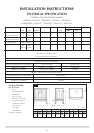
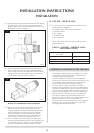
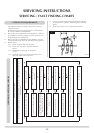
TABLE A - TOP EXIT – VERTICAL ONLY,
INCLUDING OFFSET
Vertical Height Restrictor Size
From Floor
3,000mm to 4,990mm 52mm Ø
5,000mm to 10,000mm 47mm Ø
Flue temp 400°C
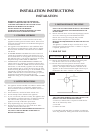
4. HANDLING & DISPOSAL OF FIRE CERAMICS
The fuel effect and side panels in this appliance are made
from Refractory Ceramic Fibre (RCF), a material which is
commonly used for this application.
Protective clothing is not required when handling these
articles, but we recommend you follow normal hygiene rules
of not smoking, eating or drinking in the work area and
always wash your hands before eating or drinking.
To ensure that the release of RCF fibres are kept to a
minimum, during installation and servicing a HEPA filtered
vacuum is recommended to remove any dust accumulated
in and around the appliance before and after working on it.
When servicing the appliance it is recommended that the
replaced items are not broken up, but are sealed within
heavy duty polythene bags and labelled as RCF waste.
RCF waste is classed as stable, non-reactive hazardous waste
and may be disposed of at a licensed landfill site.
Excessive exposure to these materials may cause temporary
irritation to eyes, skin and respiratory tract; wash hands
thoroughly after handling the material.
16
INSTALLATION INSTRUCTIONS
INSTALLATION
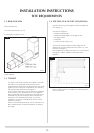
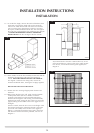
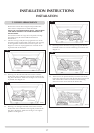
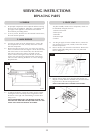
3.2.6 To determine the length of the terminal flue section measure
from the outside of the wall to the stop on the 90° elbow.
Horizontal flue sections may fitted between the elbow and
the terminal section. See diagram 7.
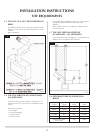
3.2.7 Once the length of the terminal has been obtained, mark
the flue all the way round, insert the cardboard fitment as
shown in diagram 8. This will support the inner flue. When
cutting take care not to damage the edges of the flue. File
any sharp edges from the cut end of the flue.
REMOVE ANY CARDBOARD FITMENT REMAINING.
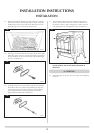
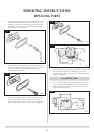
3.2.8 Remove the stove and flue assembly from the hearth and
drill the four fixing holes for the wall plate, insert the
rawlplugs supplied. Assemble the horizontal flue onto the
elbow and reposition the stove ensuring the flue slides
smoothly through the wall. alternatively, place the flue
terminal in the wall, place the stove on the hearth and
connect the flue to the elbow. Reposition the stove.
3.2.9 Fix the wall plate to the wall using the four black screws
provided. Drill through the fixing tab of the wall plate using
a 3.5mm drill and secure with the screw provided. Make
good and weatherproof around the outside of the flue.
7
AR0629
8
AR0630a