Using the vacuum pump
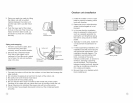
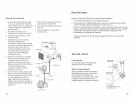
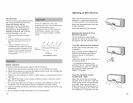
1. Completely tighten the flare nuts,
A, B, C, D, connect the manifold
valve charge hose to a charge port
of the low-pressure valve on the
gas pipe side.
2. Connect the charge hose
connection to the vacuum pump.
3. Fully open the handle Lo of the
manifold valve.
4. Operate the vacuum pump to
evacuate. After starting
evacuation, slightly loose the flare
nut of the Lo valve on the gas pipe
side and check that the air is
entering (Operation noise of the
vacuum pump changes and a
compound meter indicates 0
instead of minus)
5. After the evacuation is complete,
fully close the handle Lo of the
manifold valve and stop the
operation of the vacuum pump.
Make evacuation for 15 minutes or
more and check that the
compound meter indicates -
76cmHg (qxl0 Pa).
6. Turn the stem of the packed valve
B about 450 counterclockwise for
6-7 seconds after the gas coming
out, then tighten the flare nut
again. Make sure the pressure
display in the pressure indicator is
a little higher than the atmosphere
pressure.
7. Remove the charge hose from the
Low pressure charge hose.
8. Fully open the packed valve stems
B and A.
9. Securely tighten the cap of the
packed valve.
Indoor unit
Outdoor unit
Manifold valve
-76cm/Hg
Charge hose
Hancle Io handle hi
_ Charge hose
Vacuum pump
Electricel sefety
Check the electrical safety before finalizing the installation.
1. The insulation resistance must be higher than 2Q.
2. Grounding..After completing this step, measure its resistance with a tester.
Confirm that the grounding resistance is lower than 4t_.
3. Check for electrical leaks (complete this step during the startup test). During
the test operation, performed after completing the installation, use an electric
tester and a multimeter to check for electrical leaks. Unplug the unit
immediately if any leakage is detected.
Revise and determine the necessary solutions until the unit is operating
perfectly.
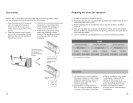
Gas leek control
Leak detector
Use the leak detector to determine
whether there is any leakage.
Water and soap method
Apply a solution of water and soap or
neutral liquid detergent to the indoor
unit connection or outdoor unit
connections with a soft brush to check
for leaks in the connection points. If
bubbles appear, the tubes are leaking.
indoor unit _ H II
control point _u
Cover y!
A= Lo valve
B = Hi valve
C & D are the inddor unit
connection ends


