


10
Maintenance And Service
CLEANING DECORATIVE SURFACES:
Painted and porcelain faces should be wiped with a damp cloth periodically. If a plated face has been
purchased, it should be unpacked/unwrapped carefully to avoid getting anything on the surface of the
nish, including cleaners, polish and nger prints. It is important to note that ngerprints and other
marks can leave a permanent stain on plated nishes. To avoid this, give the face a quick wipe with
denatured alcohol on a soft cloth BEFORE lighting the replace. Never clean the face when it is
hot. Do not use other cleaners as they may leave a residue, which can become permanently etched into
the surface.
If your ngers come into contact with the antique copper nish, the oils left as ngerprints on the copper
can cause discoloration, which will eventually turn green in that area. You can clean the patina or discolored
areas of the antique copper nish with “OO” 3M green sanding pads. These can be purchased from most
hardware stores. On the areas with discoloration, use the sanding pads to sand in the same direction as
the brushed nish, then blend the nish by feathering in the surrounding area. This renishing procedure
has been approved by the manufacturer and will not harm the nish. Please note: ANTIQUE COPPER IS
THE ONLY FINISH THAT CAN BE SANDED, DO NOT SAND PEWTER, GOLD OR NICKEL FINISHES.
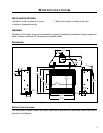
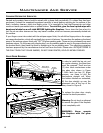
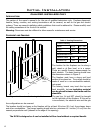
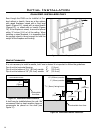
GLASS DOOR REMOVAL:
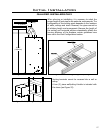
In order to install the log set, and
for regular cleaning, the glass door
must be removed. There are two
(2) door latch mechanisms under
the glass door shown in Figure
7. Each latch has two (2) nger
grooves, use these to pull the
mechanisms straight out. When
the bottom latches are unhooked,
lift the door straight up over the
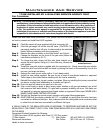
placement pins at the top of the
door, shown in Figure 8.
To replace the glass door, simply
reverse the above procedure.
Warning: Do not touch or attempt
to remove the glass if the replace
is not completely cold.
WARNING: Never operate
the replace with the glass
removed.
Door latch
mechanism
Door latch
mechanism
Finger grooves
Finger
grooves
Figure 7. Bottom latches for glass.
Figure 8. Top pins for glass door.