ULTRA FLAME DV “0” Clearance Fireplace
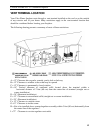
Once the position of the fireplace and the termination cap are fixed, you should select the
venting kit appropriate for your needs. First floor installations require either a STRAIGHT OUT
kit or a CORNER kit while basement installations must be done with a BASEMENT kit. Please
note that the BASEMENT kit can also be used on first (or higher) floors and it is possible to use
up to 25' of pipe with a distant installation.
1) STRAIGHT OUT INSTALLATION
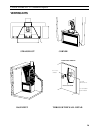
• Make a 10-1/2" x 10-1/2" opening in the wall, 29-1/2" inches above the base of the fireplace.
• Cut the radiation shield to length if necessary and install as shown. Secure with four #10 1”
wood screws.
• Install the vent pipe starting from the fireplace and working your way out.
NOTE: All joints must be sealed with RTV silicone, 315
°
C. (600
°
F) temperature resistance.
• Attach the 4" flexible pipe on the fireplace with a locking band and cut to leave a 2-
1/2" projection over the exterior wall.
• Slip on the 45°x8" elbow facing toward your wall hole. Seal it with silicone and secure with
screws.
• Add a spring spacer. The spring spacer must be located opposite the outside pipe joints to
prevent puncturing of the inside pipe when the two sections of the outside pipe are screwed
together.
• Cut the 8" diameter pipe to be flush with outside face of the exterior wall and attach it to the
45° elbow through the radiation shield.
• Secure the 8” elbow with screws and seal the pipe joints with silicone.
• Cover the 8"diameter pipe with the insulation blanket and seal joint with aluminum tape.
• Installation inside the house is now complete. The next step is to install the vent
termination cap according to the instructions in the next section.
2) CORNER INSTALLATION
• Make a 10-1/2" x 10-1/2" opening in the wall, 39-1/4" inches above the base of the fireplace.
• Cut the radiation shield to length if necessary and install as shown. Secure with four #10 1”
wood screws.
• Install the vent pipe starting from the fireplace and working your way out.
NOTE: All joints must be sealed with RTV silicone, 315
°
C. (600
°
F) temperature resistance.
• Attach the 4" flexible pipe on the fireplace with a locking band and seal with silicone cut
to leave a 2-1/2" projection over the exterior wall.
• Slip on the 45° x 8" elbow facing upward. Seal it with silicone and secure with screws.
17


