


www.desatech.com
119315-01A10
INSTALLATION
Continued
WARNING: Maintain the
minimum clearances shown
-
-
-
If your replace is to be used with an optional
mantel, the installation instructions included with
your mantel shows an CSA approved method of
attaching the replace/mantel system to a wall.
IMPORTANT: Only use optional cabinet or
corner mantels specied in this manual. Purchase
the optional mantel from your dealer (see Acces-
sories, page 34).
If your replace is to be recessed into the wall,
see Built-In Fireplace Installation to secure your
replace into the wall.
CAUTION: If you install the
For convenience and efciency, install replace
• where there is easy access for operation, inspec-
tion and service
• in coldest part of room
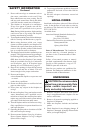
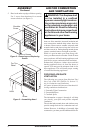
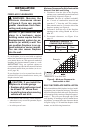
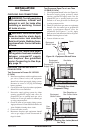
A. Clearances from the side of the fireplace
cabinet to any combustible material and wall
should follow diagram in Figure 6.
Example: The face of a mantel, bookshelf,
etc. is made of combustible material and
protrudes 3
1
/
2
" from the wall. This combus-
tible material must be 4" from the side of the
replace opening (see Figure 6).
B.
Clearances from the top of the replace
opening to the ceiling should not be less
than 36".
C. For mantel clearances, see Figure 10 on
page 13.
Figure 6 - Minimum Clearance for
Combustible to Wall
*Minimum 16" from Side Wall
*
Example
MINIMUM CLEARANCE TO
COMBUSTIBLE MATERIALS
Left and
Bottom and
Rear
36"
6" 0"
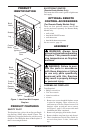
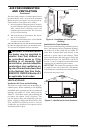
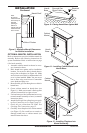
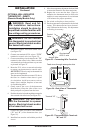
Built-in installation of this replace involves install-
ing replace into a framed-in enclosure. This makes
the front of replace ush with wall. Fireplace face
will extend past sides and top of replace approxi-
mately 1". This will cover the rough edges of the
wall opening. If installing a built-in mantel above
the replace, you must follow the clearances shown
in Figure 9, page 12. To install the replace in this
manner, use the following instructions.