


M48 Tank
13
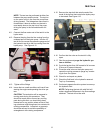
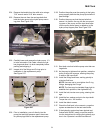
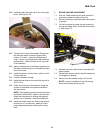
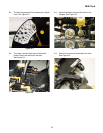
6.28. Install the brake arm and clip on the new hydro
motor. See Figure 6.28.
6.29. Transfer the O ring to flare adaptor fittings from
the old hydro motor to the new hydro motor,
using a 1” wrench. Inspect the fittings and O
rings. If there is any doubt about their condition,
replace them. Lightly lubricate the O rings with
oil on assembly.
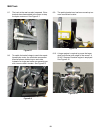
6.30. Apply a small amount of anti-seize compound to
the taper of the brake drum, and install the brake
drum on the axle.
6.31. Install the castle nut on the axle, and lock it with
a fresh cotter pin.
6.32. Connect the brake linkage.
6.33. Install the rear wheels, and torque the lug nuts to
50-70 ft.-lbs.
6.34. Check the fluid level in the reservoir, purge the
system as described in the pressure and flow
test instructions.
NOTE: If the hydraulic system has been drained
and flushed with 20W50, install a new filter and
follow the instructions for refilling the hydraulic
system in the “Operator’s and Service Manual”.
6.35. Install the wheels, lower the TANK to the ground,
and test run it in a safe area. Make any neck-
laces adjustments before installing the cutting
deck.
Figure 6.28
7. BRAKE LINKAGE ADJUSTMENT
7.1. With the TANK parked on firm level ground, lift
and safely support the back of the unit.
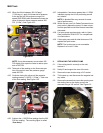
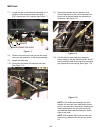
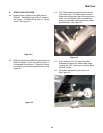
7.2. Remove the hairpin clips that hold the floor panel
in position.
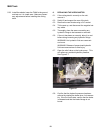
7.3. Lift the floor panel up using the grip opening at
the top rear edge, slide it to the left, and remove
it. See Figure 7.3.
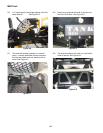
7.4. Release the hydro relief valves and release the
parking brake.
7.5. Rotate each wheel to confirm that the brakes are
not dragging or binding.
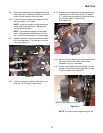
7.6. Remove the rear wheels using a 3/4” socket.
NOTE: It may be necklaces to set the parking
brake while loosening the lug nuts.
Figure 7.3