38
Heat Exchanger Cleaning Procedure
1) Turn off electrical power and gas supply to the boiler.
2) Disconnect the vent connector from the boiler.
3) Remove the blocked vent switch and the draft hood.
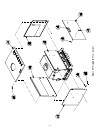
4) Remove the door panel and the top jacket panel.
5) Remove the burner access panels.
6) Remove the burners and inspect them for foreign debris and restrictions.
7) Clean the burners with a soft bristle brush and vacuum as necessary.
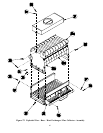
8) Remove the nuts and washers holding the flue collector onto the heat exchanger.
9) Remove the flue collector from the heat exchanger.
10) Clean the flue passageways using a stiff bristle brush. Be certain that all foreign material is removed from the
gaps between the pins.
11) Clean the bottom surfaces of the heat exchanger.
12) Put a light in the combustion chamber and look through the flue passages from the top to verify that they have
been thoroughly cleaned.
13) Replace the nuts and washers that hold down the flue collector.
14) Reseal the flue collector to the heat exchanger using furnace cement. The flue collector must be thoroughly sealed
to the heat exchanger.
15) Reattach all the jacket components.
16) Reinstall burners, being careful to put the pilot main burner in its’ original location.
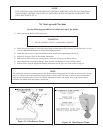
17) Reinstall the draft hood. Reinstall the blocked vent switch on the skirt of the draft hood as shown in Figure 16.
18) Reconnect the vent system including the optional vent damper (if previously installed).
WARNING
SOOT DEPOSITS IN THE FLUE PASSAGES ARE A SIGN THAT THE BOILER MAY BE OPERATING AT HIGH
CARBON MONOXIDE (CO) LEVELS. AFTER CLEANING THE BOILER OF SOOT DEPOSITS, CHECK THE CO
LEVEL IN THE FLUE GAS TO INSURE THAT THE BOILER IS OPERATING PROPERLY.
If it is necessary to check CO, use a combustion analyzer, or other instrument which is designed to measure CO in flue gas.
A CO “sniffer” designed for testing CO levels in ambient air cannot be used to check boiler combustion. Take a flue gas
sample by inserting a sample probe through a small (approx. 1/4”) hole drilled in the draft hood pipe below the skirt. Do
not take a sample until the boiler has been firing for at least five minutes. Be sure to seal the sample hole after test.
A normal CO reading for a Series 16 boiler is less than 50ppm (0.005%). A reading of more than 100ppm (0.01%) is
indicative of a combustion problem.
Some causes of excessive CO include:
• Incorrectly sized main burner orifice for the altitude at which boiler is installed
• Crooked or out-of-round orifice holes (never attempt to drill orifice for this boiler in the field)
• Partially plugged flue passages
• Improper manifold pressure
• Foreign material in burner venturis or burner ports
• Leak in seal between flue collector and heat exchanger
• Inadequate supply of combustion air
• Draft hood which has been cut or modified
36


