


Cloudmark Cartridge Installation and Administration Guide Chapter 2
10 Installing or updating the Cartridge
5 If you are upgrading from Cartridge 3046 or earlier, create the etc/license.cfg
file.
This file must contain the two-line license text that you received from
Cloudmark.
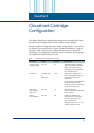
6 Update your cartridge.cfg with the latest defaults listed in the file
etc/cartridge.cfg.sample.
7 Restart the CMAE server:
bin/cmaed restart
Installation for Cloudmark Immunity
To install the Cartridge when using Cloudmark Immunity, follow the steps
below:
T
O INSTALL THE CARTRIDGE FOR IMMUNITY
1 Stop Immunity.
2 If you are updating an existing Cartridge installation, remove all of the files in
the etc/micro-updates directory.
The new Cartridge will download the correct files with which to re-populate
this directory.
3 Place the compressed Cartridge update file in the product home directory.
4 Decompress it.
• For Linux/Solaris, extract the Cartridge with the following command:
gzip –d –c < SpamDNA-3048.x.x.x-<platform>.tar.gz | tar xvf –
• For Windows, double-click the .zip file.
5 Create the etc/license.cfg file.
This file must contain the two-line license text that you received from
Cloudmark.
6 If you are updating an existing Cartridge installation, update your
cartridge.cfg with the latest defaults listed in the file etc/cartridge.cfg.sample.
7 Restart Immunity.
If you are installing Cloudmark Immunity for the first time, complete the
following additional steps:
8 Manually copy the file new_cm_egm.db.temp (externally provided) to the
following location before running dbsetup.pl:
• (Immunity 2.0.2) <immunity root>/data/new_cm_egm.db.temp