


Step 8 — Adjust Factory-Installed Options
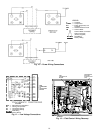
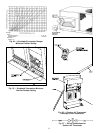
APOLLO CONTROL — The optionalApollo control is used
to actively monitor all modes of operation as well as indoor
(evaporator) fan status, filter status, and indoor-air quality.
The Apollo control is designed to work with Carrier TEMP
and VVT systems.
The thermostat must be wired to the Apollo control before
starting the unit. Refer to the Apollo control installation in-
structions for information on installing the thermostat. See
Fig. 13 for Apollo location.
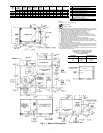
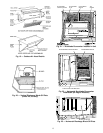
MANUAL OUTDOOR-AIR DAMPER — The outdoor-air
hood and screen are attached to the basepan at the bottom of
the unit for shipping.
Assembly:
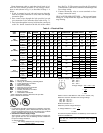
1. Determine quantity of ventilation required for building.
Record amount for use in Step 8.
2. Remove filter access panel by raising panel and swing-
ing panel outward. Panel is now disengaged from track
and can be removed. No tools are required to remove
the filter access panel. Remove outdoor-air opening panel.
Save panels and screws. See Fig. 14.
3. Separate hood and screen from basepan by removing the
screws and brackets securing them. Save all screws and
discard brackets.
4. Replace outdoor air opening panel with screws saved
from Step 2.
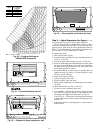
5. Place hood on front of outdoor-air opening panel. See
Fig. 15 for hood details. Secure top of hood with the
6 screws removed in Step 3. See Fig. 16.
6. Remove and save 8 screws (4 on each side) from sides
of the manual outdoor-air damper.
7. Align screw holes on hood with screw holes on side of
manual outdoor-air damper. See Fig. 15 and 16. Secure
hood with 8 screws from Step 6.
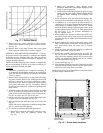
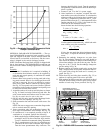
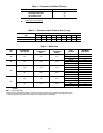
8. Adjust minimum position setting of the damper blade
by adjusting the manual outdoor-air adjustment screws
on the front of the damper blade. See Fig. 14. Slide blade
vertically until it is in the appropriate position deter-
mined by Fig. 17. Tighten screws.
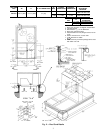
CONTROL
WIRING
APOLLO
CONTROL
WIRING TO
THERMOSTAT
Fig. 13 — Apollo Control Factory-Installed
in Typical Unit
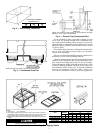
OUTDOOR
AIR OPENING
PANEL
Fig. 14 — Damper Panel with Manual
Outdoor-Air Damper Installed
Fig. 15 — Outdoor-Air Hood Details
HOOD
NOT
SHOWN)
Fig. 16 — Damper with Hood Attached
11