


—74—
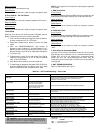
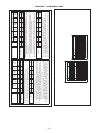
APPENDIX A — ECONOMI$ER+ LABEL
Button
1
Button
2
DS1
(Red)
DS2
(Yellow)
DS3
(Green)
DS4
(Green)
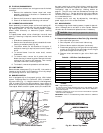
Action flash flash flash flash
Note 1
Indicators flash in sequence at .5 sec intervals
Names HB ECONO Y1 Y2
Actions flash flash steady steady
Note 1 Heartbeat Indicator flashes to indicate proper operation of the control
Note 2 Econo indicator flashes to indicate free cooling being used
Note 3 Y1 and Y2 are on steady when a call thermostat Y1 and Y2 are closed
Note 4 ERROR - HB and Econo are on steady to indicate the presence of an error
Names READ ADV SET NO I/O NO
TEN'S
OR ON
ONES OR
OFF
Actions Push Push flash, no flash no flash no flashno
Note 1 Pushand release the READ button to enter Read Mode. TheSET NO Indicator flashes once
to indicate the setup point is selected for viewing
Note 2 Pushand releaseADV button repeatedly to advance to the desired setup point or I/O point
Each time theADV button is pushed, the SET NO flashes the point number until the desired
I/O point is reached and then the I/O NO flashes the I/O point no.
Note 3 After the SET NO indicator identifies the desired point no, push and release the READ
button to display the value in the TEN's and ONE's indicator (i.e., 5 flashes for a value of 5)
or a steady TEN's indicator for an on and a steady ONE's for off.
Toaid in counting, values of 5 are flashed in groups of 5 (i.e., 150 = 3 groups of fast 5 flashes)
and then follow by balance in slow flashes (i.e., 7 = 5 quick flashes + 2 slow flashes)
Note 4 Setpointvalues are displayed first followed by I/O values and then back to Setpoint values
Red Set No LED displays Setup item numbers, and Yellow I/O LED displays I/O item no
Note 5 Routineexits after 10 min of no activity or push and hold button 1 and 2 for 3 seconds to exit
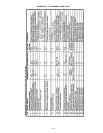
MODE OF OPERATION
READ MODE
PUSHBUTTONS LED INDICATORS
STARTUP MODE
RUN MODE
Button
1
Button
2
DS1
(Red)
DS2
(Yellow)
DS3
(Green)
DS4
(Green)
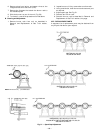
Names ADJUST ADV SETNO SETUP
TEN'S
OR ON
ONES OR
OFF
Actions Hold/Push Push flash, no steady flash no flash no
Note 1 Push and hold theADJUST button until the SETUP indicator turns on.
Note 2 Push and releaseADV button repeatedly to advance to the desired setup point.
Each time theADV button is pushed, the SET NO flashes the point number and then displays
the current setting
Note 3 Once the current value has been displayed the TENS indicator will turn on steady and while it
on use theADJUST button to enter the value. (i.e., push the button 4 times to enter 4)
Then wait for the ONES indicator to turn on and enter the ONES setting
Wait for indicator to turn off and then push read/adjust to check the setting
Note 4 Routine exits after 10 min of no activity or push and hold button 1 and 2 for 3 seconds to exit
Names ADJUST MAN MAN I/O NO
TEN'S
OR ON
ONES OR
OFF
Actions Push Hold/Push steady flash no flash no flash no
Note 1 Push and hold the MAN button until the MAN indicator turns on.
Note 2 Push and release MAN button repeatedly to advance to the desired I/O point.
Each time the MAN button is pushed, the I/O NO flashes the I/O point number.
Note 3 After the desired I/O No is reached push and release theADJUST to toggle the output on
and off or open and closed
Note 4 Routine exits after 10 min of no activity or push and hold button 1 and 2 for 3 seconds to exit
PUSHBUTTONS LED INDICATORS
SETUP MODE
MANUAL
MODE OF OPERATION
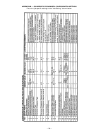
I/O POINTS
NO I/O Points UNITS
1 C1 Output -
2 C2 Output -
3 C3 Output -
4 C4 Output -
5 Economizer Damper Output %
6 Supply Air temperature F
7 Outside Air temperature F
8 Return Air Temperature F
9 Indoor Relative Humidity %
10 Outdoor Relative Humidity %
11 IndoorAir Quality PPM
12 Remote Minimum Position %
13 Y1 Status (next version) -
14 Y2 Status (next version) -
15 G Status (next version) -
16 Occ Status (next version) -
ALARM CODES
NO DESCRIPTION
1 SATsensor invalid
2 RATSensor Invalid (only with changeover type 3&5)
3 OATSensor Invalid
4 ORH Sensor invalid (only with changeover type 3&4)
5 IRH Sensor invalid (only with changeover type 5)
6 IAQ Sensor Invalid (only if IAQ=1)
7 Y2onY1off
8 Micro Fails E2 test
note 1 Micro Fails RAM test
note 2 Micro Fails ROM test
Note 1 DS1+DS3/DS2+D4 will alternately flash
Note 2 DS1+DS2/DS3+D4 will alternately flash