


6
KNOWING YOUR SEWING MACHINE
OMPELUKONEESEEN TUTUSTUMINEN
CONOZCA SU M
ÁQ
UINA DE COSER
СВЕДЕНИЯ О ШВЕЙНОЙ МАШИНЕ
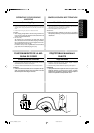
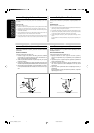
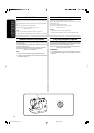
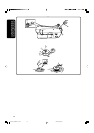
Inserting the Needle
Turn power switch to “O”.
1. Remove the power supply plug from the electrical outlet.
2. Raise the needle bar to its highest position.
3. Lower the presser foot.
4. If a needle is already installed, remove it by loosening the needle
clamp with a coin and pulling the needle down. (See fig. A.)
5. With the flat side toward the back, insert the new needle as far as
possible up against the needle stopper.
6. Tighten the needle clamp.
1 Coin
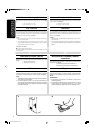
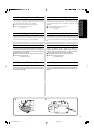
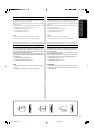
Checking the Needle
1. The sewing needle must always be straight and sharp for smooth
sewing.
2. To check if the needle is bent, place the flat side of the needle
down as shown in the illustration. (See fig. B.)
3. Replace the needle if it is bent or dull.
A
B
Neulan kiinnittäminen
Käännä virtakytkin asentoon "O".
1. Irrota koneen pistoke pistorasiasta.
2. Nosta neulatanko sen korkeimpaan asentoon.
3. Laske paininjalka.
4. Jos koneessa on jo neula, irrota se löystyttämällä neulan
kiinnitysruuvia kolikon avulla ja vetämällä neulaa alaspäin. (Katso
kuvaa A.)
5. Työnnä uusi neula litteä puoli taaksepäin mahdollisimman pitkälle
neulan pysäyttimeen asti.
6. Kiristä neulan kiinnitysruuvi.
1
Kolikko
Neulan tarkastaminen
1.
Jotta kone toimisi moitteettomasti, neulan on oltava suora ja terävä.
2. Tarkista, ettei neula ole taipunut, asettamalla neulan kanta litteä
puoli alaspäin tasaiselle alustalle kuvan osoittamalla tavalla. (Kat-
so kuvaa B.)
3. Jos neula on tylsä tai taipunut, vaihda se uuteen.
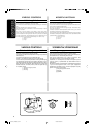
Inserción de la aguja
Coloque el interruptor principal en “O”.
1. Retire el enchufe de alimentación de la toma de corriente.
2. Levante la barra de la aguja a su posición más alta.
3. Baje el prensatelas.
4. En el caso de que ya haya una aguja instalada, retírela aflojando
el tornillo con una moneda y tirando hacia abajo. (Ver fig. A.)
5. Introduzca una nueva aguja con la parte plana hacia atrás, lo
más adentro posible hasta que llegue a su tope.
6. Apriete el tornillo de la aguja.
1 Moneda
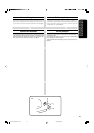
Comprobación de la aguja
1. La aguja siempre ha de estar bien recta y afilada para un perfec-
to cosido.
2. Para comprobar que la aguja no está doblada, coloque la parte
plana de la aguja hacia abajo como se muestra en el dibujo. (Ver
fig. B.)
3. Cambie la aguja si está doblada o gastada.
Установка иглы
Установите выключатель питания на “O”.
1. Выньте вилку кабеля питания из розетки электросети.
2. Поднимите игловодитель в крайнее верхнее положение.
3. Опустите прижимную лапку.
4. Если игла уже установлена, снимите ее, ослабив винт
иглодержателя монеткой и вытянув иглу вниз. (См. рис. A.)
5. Вставьте иглу до упора плоской стороной назад.
6. Затяните винт иглодержателя.
1 Монета
Проверка иглы
1. Для получения ровных строчек швейная игла должна быть
прямой и острой.
2. Для проверки состояния иглы положите ее плоской стороной
вниз, как показано на рисунке. (См. рис. B.)
3. Погнутая или тупая игла подлежит замене.
08C713_XE4683-001_P01-24 2008.04.02, 09:296