


DCN Next Generation Multi Voting en | 19
Bosch Security Systems B.V. | 2005 September | 9922 141 70392
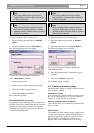
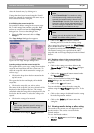
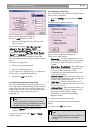
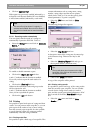
Figure 18 The ‘Legends’ dialogue box
From the ‘LCD’ drop-down list box:
• Select the LCD legend text by clicking on the
required option.
There are three options: ‘Yes’, ‘No’, ‘Yes’, ‘No’,
‘Abstain’ or ‘Yes’, ‘No’, ‘Abstain’, ‘NPPV’.
In the ‘Screen and Print Legends’ section of the
dialogue box there are ‘Time’, ‘Not Voted’, ‘Present’,
‘Casted’ and ‘Authorised’ edit fields. To the right of
these edit fields there are a number of other edit
fields (depending on the LCD legend option selected
above).
To enter a new legend text:
• Click on the required edit field.
• Enter the required legend text.
You can input a new legend text up to 10 characters.
Once you have specified all legend texts:
• Click on the ‘Ok’ push button.
3.5.3 Specifying open and closed voting
If you are voting without using a script file or if you
are voting using the default settings present when the
application is opened, you can specify whether the
voting is open or closed. For more information about
voting without using a script, please refer to
paragraph 4.2.
i Note
If you have recalled a voting from the current
script, these options are disabled and can only
be altered from the Preparation window.
• Select the ‘Settings’ menu and click on the
required option.
A tick mark (√) indicates if the ‘Open’ or ‘Closed’
option is enabled.
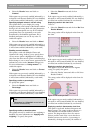
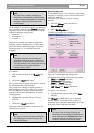
3.5.4 Specifying 100% votes
You can specify how the number of delegates taking
part in a vote is calculated.
• Select the ‘Settings’ menu and click on ‘100%
Votes’.
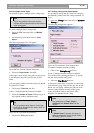
The following dialogue box appears:
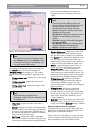
Figure 19 The ‘100% Votes’ dialogue box
There are five radio buttons:
• ‘Present Key’ - This radio button allows you to
specify that only delegates who have pressed the
present key on their contribution unit will be
counted.
• ‘Present Key + Fraud Switch’ - This radio button
allows you to specify that only delegates who
have pressed the present key on their
contribution unit and simultaneously the fraud
switch will be counted.
• ‘External Contact’ - This radio button allows you
to specify that only delegates who activated their
external contact will be counted.
• ‘Valid Votes’ - This radio button allows you to
specify that only delegates who have cast a valid
vote will be counted.
• ‘Authorized Votes’ - This radio button allows you
to specify that only delegates who have voting
authorization will be counted. Voting
authorization is specified in the Delegate
Database module.
• Click on the required radio button.
A black circle will appear in the selected radio
button.
• Click on the ‘Ok’ push button.
i Note
Refer to System Installation user manual how to
setup the Fraud switch and the External
Contact