


OPTIONAL EQUIPMENT (CONTINUED) PAGE 27
Surround Panel Installation
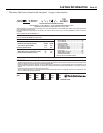
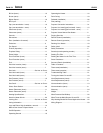
+ The surround panels come in the sizes listed below
PANEL SIZE HEIGHT WIDTH PART #
8" 28" 40" 99300259
10" 30" 44" 99300260
12" 32" 48" 99300261
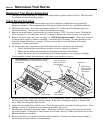
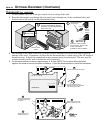
1 The insert must be in place with the gas line and vent attached prior to installing the panels. The rear
edge of the insert must be 13" behind the facing of the fireplace for the panels to fit correctly.
2 Run the power cord to either side of the insert several inches in front of the facing.
3 Follow the instructions below for installing the panels and trim.
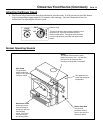
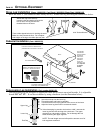
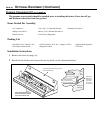
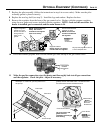
Remove the button plugs on the side of the insert (2 on each side). Pre-thread these holes by inserting
the screws (10-24 self-tapping) and tightening with a 5/16" nutdriver. Line up the holes on the side
panels over the holes exposed by removing the button plugs. Attach the side panels with the screws.
Install the top panel so the two joggle clips slide over the tab on top of the side panels..
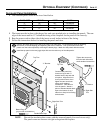
Top
Panel
Top Trim
"L" Bracket
a
b
Double-Back Tape
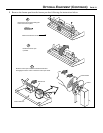
Construct the panel trim.
Insert one leg of each "L"
bracket into the top and side
trim piece. Align the trim to
form a precise corner, then
tighten the two set screws
with a small standard
screwdriver. Slide the trim
over the panels. Attach a
piece of included double-back
tape to the bottom of each
side trim to keep it from flaring
at the bottom.
c
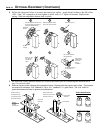
Tighten the set screws
from the back side with a
small standard screwdriver
"L" Bracket
Right Side
Trim
Top Trim
Right Side Trim
5/16" Nutdriver
Button Plugs
(pry out with a screwdriver)
Side
Panel
NOTE: Discard the insulation that comes with the surround panels (for wood stoves only).
The panels must not form an air-tight seal against the fireplace.