


15
All persons working on roofs should have successfully
completed a fall-safety course and should be properly
equipped with appropriate safety equipment.
WARNING
After completion of the collector mounting and
prior to system charging the collectors must be
covered by a blanket of other means to avoid
solar radiation from heating the collectors. The
surfaces of the collector can become extremely
hot and could pose a burn hazard
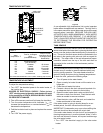
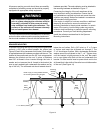
The most important structural consideration is to securely
anchor the solar collector and the mounting hardware to
the structural members of the roof with the stainless steel
hardware provided. The solar collector must be attached to
the mounting hardware as detailed in Figure 17.
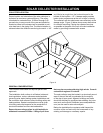
Preserving the integrity of the roof membrane is the
most important roofi ng consideration. Ensure that all
roof penetrations required to plumb and mount the solar
collector are properly fl ashed and sealed in accordance
with standard roofi ng practices.
If the region is subject to hurricane conditions, additional
steps may be required to secure the collector and
mounting hardware to the structural members. In certain
areas of the country, local building codes may require
collector wind load testing or prescribe specifi c mounting
procedures. Consult your local building department.
Install the collectors as described in the Spanner
Mounting instructions.
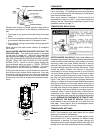
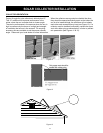
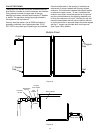
Mounting
Bracket
(Foot)
Roof
Rafter
(2” x 6”)
Roof
Rafter
(2” x 6”)
Spacer
Block
(2” x 6”)
2” x 4” Wood (Lumber)
Shingles
Plywood
Sheeting
NOTE: Apply a roofing sealant between
the mounting bracket and shingles.
Figure 14
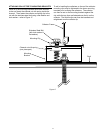
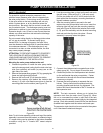
SPANNER MOUNTING
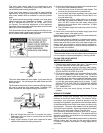
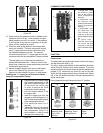
In spanner mounting after the mounting feet are positioned
correctly, a 3/8” hole is drilled between the rafters (see
Figures 15 and 16 for placement of drill holes). Roof sealant
is applied between the hardware provided and the roof. The
bracket is then positioned over the 3/8” hole using sealant
between the bracket and the roof. A piece of stainless
steel 3/8” all-thread is then inserted through the hole. A
washer and nut secures the all- thread to the bracket (be
sure to apply sealant/caulk underneath the washer and on
top of the nut). The all-thread rod should extend about 4”
below the roof rafters. Drill a 3/8” hole in a 2” x 4” piece
of lumber and insert the all-thread rod through it. The
2” x 4” should span 2 rafters. With a lockwasher and fender
washer secure the all-thread to the 2” x 4”. Tighten down
until the bracket is tightly secured to the roof. Be careful
not to over-tighten and dish out the roof underneath the
bracket. For best results insert a spacer block next to the
all-thread that is the width of the rafter to avoid deformation
of the roof. (See Figure 14)