


12
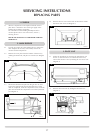
3.5 Check the pull of the flue system by applying a lighted
smoke pellet to the flue system opening. If there is a
definite flow into the chimney, proceed with the
installation, if not warm the chimney for a few minutes.
IF THERE IS STILL NO DEFINITE FLOW, THE FLUE MAY
REQUIRE ATTENTION - SEEK EXPERT ADVICE.
3.6 The flue system may now be connected to the stove, ensure
that all joints are sealed with a suitable fire resistant sealant.
It is also recommended that a physical retention method be
used at the flue spigot joint, self-tapping screws being
favoured.
3.7 Connect a suitable pressure gauge to the test point located
on the inlet fitting, and turn the gas supply on. Light the
appliance and check all gas joints for gas soundness. Turn
the appliance to maximum and check that the supply
pressure is as stated on the data badge. Turn the gas off and
replace the test point screw, turn the gas on and check the
test point for gas soundness.
4. FUEL BED ARRANGEMENT
ADVICE ON HANDLING AND DISPOSAL OF FIRE
CERAMICS
4.1 The fuel effect logs and embers in this stove are made from
Refractory Ceramic Fibre (RCF). Protective clothing is not
required when handling these articles, but we recommend
you follow normal hygiene rules of not smoking, eating or
drinking in the work area and always wash your hands
before eating or drinking. Excessive exposure to these
materials may cause temporary irritation to eyes, skin and
respiratory tract; wash hands thoroughly after handling the
material.
4.2 To ensure that the release of RCF fibres is kept to a
minimum a HEPA filtered vacuum is recommended to
remove any dust accumulated in and around the stove.
4.3 When servicing the stove it is recommended that the
replaced items are not broken up, but are sealed into heavy
duty polythene bags and labelled as RCF waste. RCF waste
is classed as stable, non-reactive, hazardous waste and may
be disposed of at a licensed landfill site.
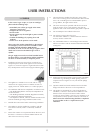
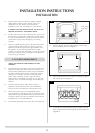
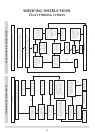
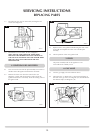
4.4 Turn and pull right hand rose to open door (see Diagram 5).
AR2378
5
Turn rose to
open door
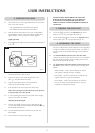
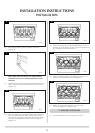
4.5 Remove the glass frame by undoing the 6 x frame fixing
screws and lifting clear (see Diagram 6).
6
AR1909
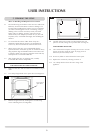
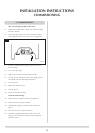
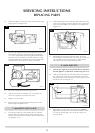
4.6 Place the flame baffle onto the burner and push up against
the rear tray lip (see Diagram 7).
AR0359
7
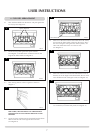
4.7 Locate the rear panel against the spacer brackets and slide
down so that it locates on the ledge of the flame baffle (see
Diagram 8).
INSTALLATION INSTRUCTIONS
INSTALLATION