


4
Please Do Not Return This Product To The Store. Contact your local Wayne-Dalton dealer. To find your local Wayne-Dalton dealer, refer to your
local yellow pages/business listings or go to the Find a Dealer section online at www.wayne-dalton.com
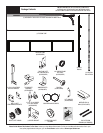
Tools Needed:
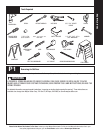
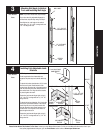
Package Contents Continued...
1/4”- 20 X 5/8”
CARRIAGE BOLTS
(AS REQUIRED)
(2) 1/4”- 20 HEX NUTS 1/4”- 20 FLANGE HEX
NUTS (AS REQUIRED)
3/8”- 16 HEX NUTS
(AS REQUIRED)
(2) 1/4”- 20 X 5/8” TAMPER
RESISTANT SCREWS
(2) 1/4” X 2-1/2” CARRIAGE BOLTS
1/4”- 20 X 7/8” SELF DRILLING
SCREWS (AS REQUIRED)
3/8”- 16 X 3/4” HEX HEAD BOLTS
(AS REQUIRED)
5/16” X 2” TAMPER RESISTANT LAG SCREWS
(AS REQUIRED)
(2) 3/8”- 16 X 1-1/2” HEX HEAD BOLTS 5/16” X 2” HEX HEAD LAG SCREWS
(AS REQUIRED)
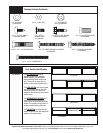
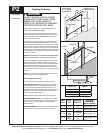
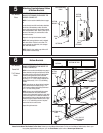
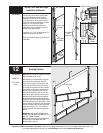
The BOTTOM SECTION can be
identified by the factory attached
bottom astragal, or by the bottom
bracket warning labels on each end
stile. This section is always the 1st
section on four and five section doors.
The LOCK SECTION may have a yellow
and black warning label on the right
side of the section. This section is
always the 2nd section on four and five
section doors.
The INTERMEDIATE I SECTION may
have a warning label attached to
either right or left hand end stile of the
section. This section is always the 3rd
section from the bottom of the door.
The TOP SECTION is always the 4th
section on four section door and the 5th
section on five section door.
Door Section Identification
TOP SECTION
LOCK SECTION
BOTTOM SECTION
BOTTOM BRACKET
WARNING LABELS
ASTRAGAL
INTERMEDIATE I SECTION