


VL SERIES STEAMER - SERVICE PROCEDURES AND ADJUSTMENTS
Pa
g
e 29 of 88
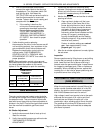
C. Gas burner ports clo
gg
ed or obstruction
around air shutter. After a period of time,
g
as burners can accumulate carbon in
their ports or become clo
gg
ed by food and
g
rease debris from kitchen cleanin
g
,
restrictin
g
performance. To clean burners,
remove them from burner box and boil in
water for 10 -15 minutes to dislod
g
e clo
g
.
Clean-out any remainin
g
debris from the
g
as ports usin
g
a wire brush, scribe or pic
type metal instrument. Remove any other
forei
g
n objects that appear to be
obstructin
g
the
g
as ports or air shutters.
D. Gas orifice clo
gg
ed or obstructed around
air shutter. It is possible for debris to
become lod
g
ed in the small
g
as orifice
openin
g
over time. Clean-out the
g
as
orifice usin
g
a round metal instrument of
the same hole diameter or sli
g
htly smaller.
Clean as needed. If clo
gg
in
g
reappears,
the orifice should be removed, cleaned
and reinstalled. Remove any other forei
g
n
objects that appear to be obstructin
g
the
g
as orifice or air shutters.
3. Electric Models
A. One or more electric heatin
g
elements
malfunctionin
g
. See “HEATING
ELEMENTS”
B. One or more heater contactors not pullin
g
in to power heatin
g
elements.
C. If steamer operates under three phase
power, then check line for all phases.
D. Heavy scale build up on heatin
g
element
causes reduced heatin
g
.
4. Direct Steam Models
A. Buildin
g
steam supply pressure low.
B. Cookin
g
compartment steam solenoid
valve malfunction.
C. Steam pressure re
g
ulator adjusted too
low.
D. Clo
gg
in
g
in the steam line reduces steam
supply.
5. Regenerated (Steam Coil) Steamers
A. Heavy scale build up inside copper steam
coil.
B. Buildin
g
steam supply pressure low
C. Cookin
g
compartment steam solenoid
valve malfunction.
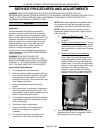
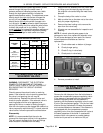
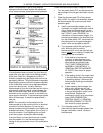
INLET WATER STRAINER
The in-line Y strainer should be located upstream of
the fill valve solenoid. Shut off the water supply.
Unscrew the cap from the body on the le
g
of the Y
that should be pointin
g
downwards toward the floor.
Remove the screen and any forei
g
n particles
trapped in the openin
g
. Rinse the screen thorou
g
hly
to remove accumulated debris and replace the
screen in the valve body. If screen can not be
thorou
g
hly cleaned, replace it with a new one.
Reinstall the cap and ensure that the Y strainer is
positioned with the cap pointin
g
downward to catch
debris.
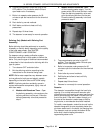
The pressure re
g
ulatin
g
valve strainer will become
clo
gg
ed if dirty steam lines are connected to direct
steam models. Remove the hex nut on the bottom
of the pressure re
g
ulatin
g
valve to clean the strainer
and valve seat.
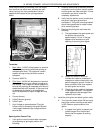
PILOT AND THERMOCOUPLE
ASSEMBLY (GAS MODELS)
WARNING: DISCONNECT THE ELECTRICAL
POWER TO THE MACHINE AT THE MAIN
CIRCUIT BOX. PLACE A TAG ON THE CIRCUIT
BOX INDICATING THE CIRCUIT IS BEING
SERVICED.
WARNING: SHUT OFF THE GAS BEFORE
SERVICING THE UNIT.
The pilot thermocouple when heated, supplies a DC
millivolt si
g
nal to an internal solenoid valve on the
g
as combination control valve. This solenoid valve
is desi
g
ned to shut off the
g
as flow to the pilot and
main burners in case of a malfunction in the system.
When ener
g
ized by the thermocouple volta
g
e, the
valve is held in the open position to permit
g
as flow.
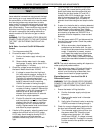
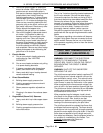
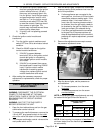
The pilot burner flame is controlled by an adjustable
needle valve located under a small cap screw on
the combination control valve.
When experiencin
g
pilot outa
g
es, visually check
pilot flame for the proper contact on thermocouple
and the flame color. Also, check to see that
excessive air drafts are not interferin
g
with proper
heatin
g
of the thermocouple by the pilot flame.
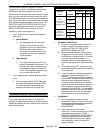
The pilot flame should be a steady blue flame that
envelopes the thermocouple tip. The flame should
be about one inch lon
g
with half its len
g
th extendin
g
beyond the outer ed
g
es of the pilot shield. If the pilot
flame does not appear to be this len
g
th and color,
then adjust as necessary. See the dia
g
ram below for
an example of unsatisfactory pilot flames. Turn
clockwise
to decrease pilot flame and
counterclockwise
to increase.