


All installations and services must be performed by qualified service personnel.
excessive wear. Replace it, if required. Check and adjust oil pump pressure, if
needed. Refer to Initial Heating System Adjustments section of this manual.
4. Heat Exchanger – Visually inspect the heat exchanger for excessive carbon
(soot) build-up. Refer to the Heat Exchanger section of the manual.
5. Oil Filter – Replace the supply line oil filter cartridge with a new filter of the same
type and rating. Clean the body of, or mounting plate for, the oil filter.
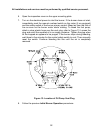
6. Evaporator and Condenser Coils – Inspect both the evaporator and the
condenser coils for dust, dirt, debris, and insects lodged between the fins.
Remove any foreign materials found using a vacuum cleaner with a brush
attachment or a water spray from a garden hose. Carefully straighten any bent
fins with a thin piece of wood or a fin comb.
7. Labels and Markings - Clean all appliance labels, markings, and instruction
plates, as necessary, and verify that all are still legible. Any illegible or missing
markings must be replaced. Replacements can be obtained by contacting
Thermo Products.
B. Heat Exchanger
: A qualified heating contractor must clean the heat exchanger.
At least once a year, inspect the heat exchanger for evidence of corrosion, pitting,
warpage, deterioration, and carbon (soot) build-up. A layer of soot on the inside of
the heat exchanger will act as an insulator and reduce heat transfer, resulting in less
heating efficiency.
Also, look for loose or deteriorated gaskets and insulation around the flue pipe, the
burner, and accessible areas of the heat exchanger. If this inspection indicates heat
exchanger cleaning is necessary, follow the heat exchanger cleaning instructions
below.
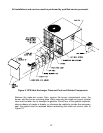
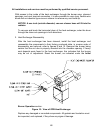
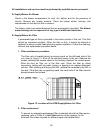
1. Disassembly to Access Heat Exchanger
To clean the heat exchanger, first turn off all electrical power to the unit. Next,
remove the cleanout access panel inside the burner compartment to gain entry to
the cleanout covers, refer to Figure 9.
46