SECTION C: Installation
33
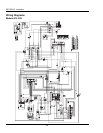
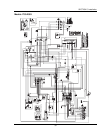
pump relay and the blower receives power but
does not energize at this time and terminal L1 the
ignition module is powered.
3. The 120/24 VAC transformer sends a 24 VAC hot
power signal to the 24V Terminal Block.
4. 24 VAC is sent from the 24V Terminal Block to
pin L1 of the Low Water Cut Off, the 24 VAC
terminal of the ignition control module, the green
LED on the front of the heater to signify “Power
On”, terminal R (pin #24) of the modulating tem-
perature control, the NC contacts of the manual
high limit, pin P3-1 of the UDB board, pin P1-1 of
the UDB board, pin J5-5 of the UGB board, the
NC contacts of the alarm relay, the red LED on the
front of the heater to signify “Service” if in alarm
mode and the NO pump contacts on the tempera-
ture controller.
24 VAC is sent from the NC contacts of the man-
ual high limit to pin P3-2 of the UDB board and to
the common terminal of the Low Water Cut Off (if
equipped).
Upon loss of water in the heater, the Low Water
Cut Off will send a 24 VAC signal to pin P3-4 of
the UDB board to indicate a safety fault.
5. A 24 VAC signal is sent from the NO contacts of
the Low Water Cut Off to the common terminal of
the Blocked Vent Switch.
During a blocked vent condition a 24 VAC signal
is sent from the NO open contacts of the Blocked
Vent Switch to Pin P3-5 of the UDB board to indi-
cate a safety fault.
6. During normal operation of the heater, the 24
VAC signal will exit the NC contacts of the
Blocked Vent Switch and is sent to the common
terminal, of the Low Gas Pressure Switch (if
equipped).
During a low gas pressure condition, 24 VAC is
sent from the NC contacts of the Low Gas Pres-
sure Switch to Pin P3-6 of the UDB board to
indicate a safety fault.
7. 24 VAC is sent from the NO contacts of the Low
Gas Pressure Switch to the common terminal of
the High Gas Pressure Switch (if equipped).
During a high gas pressure condition, 24 VAC is
sent from the NO contacts of the High Gas Pres-
sure Switch to Pin P3-7 of the UDB board to
indicate a safety fault.
8. 24 VAC is sent from the NC contacts of the High
Gas Pressure Switch to energize the alarm relay
coil and to the common terminal of the Auto Reset
High Limit (if equipped).
If the Auto Hi Limit opens, a 24 VAC is sent to
Pin P3-3 of the UDB board to indicate a safety
fault.
9. 24 VAC is sent from the NC contacts of the Auto
Reset Hi Limit to the common terminal of time de-
lay relay.
10. 24 VAC is sent from the NC contacts of time delay
relay to the common terminal of the burner switch
located on the front exterior panel of the heater.
11. Power then travels to the enable/disable connec-
tion and to the Ht D (heat demand) connection of
the modulating temperature control.
Power splits from the enable/disable and goes to
the stage contact of the modulating temperature
control.
12. When the stage contact closes on the modulating
temperature control, 24 VAC is sent to the com-
mon terminal of the flow switch and to pin P1-3
(CFH) of the UDB board. 24 VAC is now sent di-
rectly to the amber LED on the front of the heater
to signify a “Call For Heat”.
13. The pump contact on the modulating temperature
control closes sending 24 VAC to the pump switch
located on front exterior panel of the heater.
14. When the pump switch is closed 24 VAC is sent to
the coil of the pump relay.
15. The pump relay energizes and closes the contacts,
starting the heater pump.
16. Upon sufficient flow, the flow switch closes and
sends 24 VAC to the common terminal of the air
pressure switch, the lockout relay coil and the NO
contacts of the lockout relay. A 24 VAC signal is
also sent from the common terminal of the air
pressure switch to pin F1 of the ignition module.
If the flow switch does not close, a 24 VAC signal
is sent to pin P4-9 of the UDB board to indicate an
insufficient flow condition.


