41
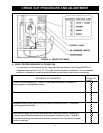
I. Remove regulator cover screw on top of gas valve, and insert an appropriate screw-
driver into adjustment screw.
II. Turn adjustment screw clockwise to increase input rate, or counter clockwise to de-
crease input rate.
III. Replace cover screw, or cover hole temporarily with your finger to check new mani-
fold pressure setting. Do not set manifold pressure lower than 2.0 inches w.c. or
higher than 3.0 inches w.c. when adjusting input rate.
IV. Measure new input rate (cover screw must be installed). Repeat steps I.-IV until the
input rate is within +/-2% of the nameplate input rating.
V. If the actual input rate can not be set to within 2% of the correct input rating by adjust-
ing manifold pressure, a change in gas orifice size is required. Consult the boiler
manufacturer for information on correct orifice sizing. The specific gravity (G) and the
higher heating value (HHV) of the local natural gas must be obtained from the local
gas utility in order to determine the proper orifice size.
f. After adjusting input rate, turn boiler off, remove manometer or pressure gauge, reinstall
1/8" plug on gas valve. Turn boiler on.
9.Restore all gas appliances that may have been shut off (while measuring boiler input
rate) to normal operating conditions.
J. SET THERMOSTAT TO DESIRED ROOM TEMPERATURE
Observe several operating cycles to verify proper operation.
K REVIEW ALL INSTRUCTIONS
Review all instructions shipped with this boiler with owner or maintenance person. Instructions
must be affixed on or adjacent to the boiler.
L. COMPLETE AND SIGN THE INSTALLATION AND CHECK-OUT CERTIFICATE ON THE
FOLLOWING PAGE.


