A. CHECK THE PIPING
1. Water Piping
a) The Boiler must have been hydrostatically tested.
b) Check the attached piping for joint tightness.
c) Continue monitoring as you proceed through
start up.
2. Gas Piping
a) Make sure the gas system piping and the
connections to the boiler Gas Control Train(s)
have been leak tested.
b) After the boiler is in operation, check the
tightness of all joints in the boiler gas piping with
a soap suds solution.
c) Purge the gas piping of all air up to the boiler
Gas Control Train.
3. Oil Piping
a) Check the oil piping visually. Make sure all joints
are tight.
b) When the burner is firing, check the suction line
and return line pressures.
c) If the pressure exceeds the allowable pressure in
the Burner Manual or if the suction line vacuum
is higher than allowable, correct the piping as
needed to bring the suction line and return line
pressures within acceptable range.
d) Excess pressure can cause pump seal failures.
Excess vacuum will cause fuel flow problems
with the burner oil pump.
B. FILL THE BOILER
1. Fill the boiler and system.
a) Fill the system with fresh water only. If the water
hardness is high, use water treatment to reduce
the deposition of minerals in the boiler.
b) If the system requires antifreeze, use only
antifreeze designed for hydronic systems. These
contain inhibitors to prevent corrosion of the
boiler and system components. Do not use
ethylene glycol or automotive antifreezes.
• Make sure the antifreeze supplier can provide
periodic inhibitor check service.
• If automatic fill is used, the system will have
to be checked periodically to make sure the
antifreeze concentration has not been diluted
below design level.
• Local codes may require the use of a
backflow preventer or manual fill only with
separation from the city supply.
• Consider the minimum temperature of
potential exposure for the system when
deciding on the antifreeze concentration. A
concentration of 50% generally provides
protection from freezing down to -30°F.
2. Purge the air from the system.
C. RUN BURNER CHECK-OUT
1. Before firing the burner, slide the Slide Gate Damper
on the rear flue box all the way down (full open) on
LC’s or open the LCE Draft Damper until the handle
is parallel to the vent pipe (full open).
2. Follow the instructions in the Burner Manual for
starting the burner, adjusting air openings and fuel
rates. Perform ignition system and flame supervisory
control test and checkout as described in the
manual.
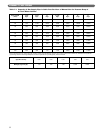
3. After burner is set at rate, close the damper until the
pressure reading at the test opening in the rear flue
box or draft damper is between 0" wc and 0.1" wc
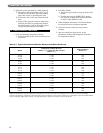
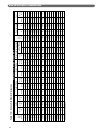
positive. See Table 9.1 for typical overfire pressure
(measured at the burner front plate) and boiler draft
loss.
When a barometric draft regulator is installed in the
venting system, adjust the boiler damper for 0" wc
pressure reading at the damper. Adjust the draft
regulator for -0.05" wc draft between the boiler
damper and the draft regulator.
37
9. STARTING THE BOILER
STARTING THE BOILER
Check the system for leaks and make sure the
automatic fill valve (if used) and the expansion tank
are operating correctly. Leakage or weeping of the
relief valve will cause make-up water to be added to
the system. Excessive make-up water will damage
the boiler and system components due to liming and
oxygen corrosion.
CAUTION
The boiler gaskets will be damaged by petroleum or
its derivatives.
Do not use petroleum based compounds in the
boiler, including petroleum-based stop-leak
compounds.
CAUTION
On installations with high draft, do not leave the
boiler with a negative draft reading at the rear flue
box or draft damper. High negative draft can pull the
flame up into the boiler crown sheet and overheat the
iron. This can result in cracked sections or shortened
boiler life.
CAUTION


