


- 52 - - 9 -
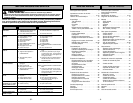
Renseignements importants . . . . . . . . . . . . . 3
Importantes mesures de sécurité . . . . . . . . . 6
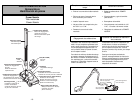
Nomenclature . . . . . . . . . . . . . . . . . . . 10-12
Tableau des caractéristiques . . . . . . . . . . . 13
Assemblage . . . . . . . . . . . . . . . . . . . . . . . 15
Tête motorisée . . . . . . . . . . . . . . . . . . . 15
Chariot . . . . . . . . . . . . . . . . . . . . . . . . . . 15
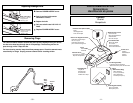
Couvercle . . . . . . . . . . . . . . . . . . . . . . . 17
Tuyau . . . . . . . . . . . . . . . . . . . . . . . . . . 17
Rangement des accessoires . . . . . . . . . 17
Turbine à air et porte-turbine à aire . . . . 19
Fonctionnement . . . . . . . . . . . . . . . . . . . . . 21
Cordon d’alimentation . . . . . . . . . . . . . . 21
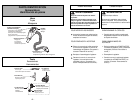
Interrupteur . . . . . . . . . . . . . . . . . . . . . . 23
Réglage de tube télescopique . . . . . . . . 23
Réglage de l’inclinaison du manche . . . 25
Réglage de la hauteur des brosses . . . . 25
Utilisation des accessoires . . . . . . . . 27-29
Conseils pratiques . . . . . . . . . . . . . . . . 31
Caractéristiques . . . . . . . . . . . . . . . . . . . . 31
Protecteur de surcharge . . . . . . . . . . . . . .31
Indicateur électonique de sac/tuyau . . . . .33
Régulateur d’aspiration . . . . . . . . . . . . . .33
Tuyau pivotant . . . . . . . . . . . . . . . . . . . 33
Nettoyeur latéral . . . . . . . . . . . . . . . . . . 35
Protecteur thermique . . . . . . . . . . . . . . . 35
Entretien de l’aspirateur . . . . . . . . . . . . . . . 37
Remplacement du sac à poussière . . . . . 37
Replacement du filtre de sécurité
du moteur . . . . . . . . . . . . . . . . . . . . . . . 39
Remplacement du filtre
d’échappenment . . . . . . . . . . . . . . . . . . 41
Nettoyage du boîtier
et des accessoires . . . . . . . . . . . . . . . . 43
Entretien de la tête motorisée . . . . . . . . . . 43
Retrait de la courroie . . . . . . . . . . . . . . . 45
Remplacement de la courroie . . . . . . . . 47
Entretien des brosses . . . . . . . . . . . . . 49
Remplacement de l’ampoule
de la lampe . . . . . . . . . . . . . . . . . . . . . . 51
Dégagement des obstructions . . . . . . . . . 51
Guide de dépannage . . . . . . . . . . . . . . . . . 53
Garantie . . . . . . . . . . . . . . . . . . . . . . . . . . 56
Remarques . . . . . . . . . . . . . . . . . . . . . . . . 59
Service après-vente . . . . . . . . . . . . . . . . . . 60
Table des matières
Tabla de contenido
Información para consumidor . . . . . . . . . . . . 4
Instrucciones importantes
de seguridad . . . . . . . . . . . . . . . . . . . . . . . . 7
Identificación de piezas . . . . . . . . . . . . 10-12
Diagrama de características . . . . . . . . . . . 13
Montaje . . . . . . . . . . . . . . . . . . . . . . . . . . . 15
Power Nozzle . . . . . . . . . . . . . . . . . . . . 15
Aspiridora . . . . . . . . . . . . . . . . . . . . . . . 15
Cubierta . . . . . . . . . . . . . . . . . . . . . . . . 17
Mango . . . . . . . . . . . . . . . . . . . . . . . . . . 17
Almacenaje de herramientas . . . . . . . . . 17
Aire Turbine y bandeja . . . . . . . . . . . . . . 19
Para operar la aspiradora . . . . . . . . . . . . . . 21
Cordón eléctrico . . . . . . . . . . . . . . . . . . 21
Control On/Off . . . . . . . . . . . . . . . . . . . . 23
Ajustes del tubo telescópico . . . . . . . . . . 23
Ajustes del mango . . . . . . . . . . . . . . . . . 25
Sugerencias sobre el ajuste de nivel
de pelo de la alfromba . . . . . . . . . . . . . . 25
Uso de herramientas . . . . . . . . . . . . 27-29
Sugerencias para aspirar . . . . . . . . . . . . 31
Características . . . . . . . . . . . . . . . . . . . . . 31
Protector contra subrecargas . . . . . . . . . .31
Indicator electronico . . . . . . . . . . . . . . . . .33
Control de aspiratión . . . . . . . . . . . . . . . . .33
Dispositivo giratorio de la manguera . . . . 33
Limpiador de orillas . . . . . . . . . . . . . . . . 35
Protector termal . . . . . . . . . . . . . . . . . . . 35
Cuidado de rutina de la aspiradora . . . . . . . 37
Cambio de la bolsa de polvo . . . . . . . . . 37
Cambio del filtro . . . . . . . . . . . . . . . . . . . 39
Cambio del filtro de escape . . . . . . . . . . . 41
Limpieza del exterior y del
los herramientas . . . . . . . . . . . . . . . . . . . 43
Cuidado del a Power Nozzle . . . . . . . . . . . . 43
Sacando la correa . . . . . . . . . . . . . . . . . 45
Cambio de la correa . . . . . . . . . . . . . . . . 47
Cuidado del cepillo . . . . . . . . . . . . . . . . . 49
Cambio de la bombilla . . . . . . . . . . . . . . 51
Quitando de los residuos de basura
en los conductos . . . . . . . . . . . . . . . . . . 51
Antes de pedir servicio . . . . . . . . . . . . . . . . 54
Garantía . . . . . . . . . . . . . . . . . . . . . . . . . . . 57
Notas . . . . . . . . . . . . . . . . . . . . . . . . . . . . . 59
Cuando necesita servicio . . . . . . . . . . . . . 60
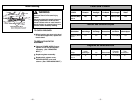
Vacuum cleaner 1. Unplugged at wall outlet. 1. Plug in firmly, push ON/OFF switch to ON.
won’t start. 2. Tripped circuit breaker/blown fuse 2. Reset circuit breaker or replace fuse.
at household service panel.
3. Loose hose electrical connections. 3. Reconnect hose ends.
Poor job of dirt 1. Full or clogged dust bag. 1. Change bag.
pick-up. 2. Clogged airflow passages. 2. Clear airflow passages.
3. Dirty safety filter. 3. Replace filter.
4. Wrong pile height setting. 4. Adjust setting.
5. Open suction control. 5. Adjust control.
6. Hole in hose. 6. Replace hose.
7. Worn POWER NOZZLE brushes. 7. Replace agitator.
8. Worn or broken belt. 8 & 9. See REMOVING BELT and REPLACING
9. Dirty agitator or end caps. BELT.
10. Canister hood open. 10. Close and latch hood.
Vacuum cleaner starts but 1. Hose or hood electrical connections. 1. Check connections, reconnect hose
cuts off. ends.
2. Tripped overload protector in 2. Remove any items that may be caught
POWER NOZZLE. or jammed, then reset. If vacuum cleaner
starts and stops again, clean agitator and
end caps, then reset.
3. Tripped thermal protector 3. Change dust bag, clear airflow blockage.
in canister. Wait 30 minutes for motor to cool and
automatically reset.
Power Nozzle will not 1. POWER NOZZLE connections 1. Plug in firmly.
run when attached. unplugged.
2. Worn or broken belt. 2 & 3. See REMOVING BELT and REPLACING
3. Dirty agitator or end caps. BELT.
4. Tripped overload protector in 4. Remove any items that may be caught
POWER NOZZLE.
.
or jammed, then reset. If vacuum cleaner
starts and stops again, clean agitator and
end caps, then reset.
Performance indicator 1. Full or clogged dust bag. 1. Change bag.
is red. 2. Dirty filter. 2. Replace filter.
3. Clogged airflow passage. 3. Clear clog from airflow passage.
4. Certain attachment tools. 4. This is normal. Light should go off
when tool is removed.
Vacuum Cleaner picks up 1. Wrong pile height setting. 1. Adjust setting.
moveable rugs -or- Power 2. Suction too strong. 2. Open suction control.
Nozzle pushes too hard.
Light won’t work. 1. Burned out light bulb. 1. Change light bulb.
Cord won’t rewind. 1. Dirty power cord. 1. Clean the power cord.
2. Cord jammed. 2. Pull out cord and rewind.
Vacuum cleaner leaves 1. Wrong vacuuming pattern. 1. See VACUUMING TIPS.
marks on carpet.
PROBLEM POSSIBLE CAUSE POSSIBLE SOLUTION
BEFORE REQUESTING SERVICE
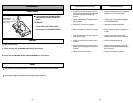
WARNING
Electric Shock or Personal Injury Hazard.
Disconnect the electrical supply before performing maintenance to the vacuum cleaner.
Failure to do so could result in electric shock or personal injury from vacuum cleaner
suddenly starting.
Review this chart to find do-it-yourself solutions for minor performance problems.
Any service needed, other than those described in these Operating Instructions,
should be performed by an authorized service representative.