


91
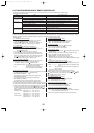
[Operating Procedure]
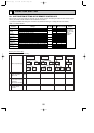
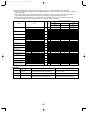
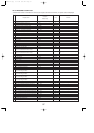
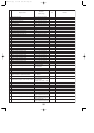
1 Check the setting items provided by function selection.
If settings for a mode are changed by function selection, the functions of that mode will be changed accordingly. Check all the current settings according to steps 2
to 7, fill in the "Check" column in Table 1, then change them as necessary. For initial settings, refer to the indoor unit's installation manual.
2 Switch off the remote controller.
A Hold down the ( mode is 15 to 28)and B
buttons simultaneously for at least 2 seconds. will start to blink,
then the remote controller's display content will change as shown below.
FILTER
3 Set the outdoor unit's refrigerant address.
C Press the [
CLOCK] buttons ( and ) to select the desired
refrigerant address. The refrigerant address changes from "00" to "15".
(This operation is not possible for single refrigerant systems.)
* If the unit stops after
FUNCTION
SELECTION
blinked for 2 seconds or "88" blinks in the room temperature display area for 2 seconds, a transmission error may have occurred.
Check to see if there are any sources of noise or interference near the transmission path.
Note : If you have made operational mistakes during this procedure, exit function selection (see step 0), then restart from step 2.
4 Set the indoor unit number.
D Press the
ON/OFF
button so that "- -" blinks in the unit number display
area.
C Press the [
CLOCK] buttons ( and ) to select the unit number
of the indoor unit for which you want to perform function selection. The unit
number changes to "00", "01", "02","03",04" and "AL" each time a button is
pressed.
* To set modes 01 to 06 or 15 to 22, select unit number "00".
* To set modes 07 to 14 or 23 to 28, carry out as follows:
To set each indoor unit individually, select "01" to "04".
To set all the indoor units collectively, select "AL".
5 Confirm the refrigerant address and unit number.
E Press the
MODE
button to confirm the refrigerant address and unit
number.
After a while, "- - " will start to blink in the mode number display area.
E When the refrigerant address and unit number are confirmed by pressing the
MODE
button, the corresponding indoor unit will start fan operation. This
helps you find the location of the indoor unit for which you want to perform function
selection. However, if "00" or "AL" is selected as the unit number, all the indoor
units corresponding to the specified refrigerant address will start fan operation.
* "88" will blink in the room temperature display area if the selected refrigerant
address does not exist in the system.
Furthermore, if
"F"
appears and blinks in the unit number display area and the
refrigerant address display area also blinks, there are no units that corre-
spond to the selected unit number. In this case, the refrigerant address and unit
number may be incorrect, so repeat steps 2 and 3 to set the correct ones.
* When grouping different refrigerant systems, if an indoor unit other than the
one to which the refrigerant address has been set to perform fan operation,
there may be another refrigerant address that is the same as the specified one.
In this case, check the DIP switch of the outdoor unit to see whether such a
refrigerant address exists.
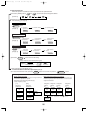
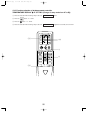
6 Select the mode number.
F Press the [
TEMP] buttons ( and ) to set the desired mode
number.
(Only the selectable mode numbers can be selected.)
7 Select the setting content for the selected mode.
G Press the
MENU
button. The currently selected setting number will
blink, so check the currently set content.
F Press the [
TEMP] buttons ( and ) to select the desired setting
number.
8 Register the settings you have made in steps 3 to 7.
E Press the
MODE
button. The mode number and setting number will start
to blink and registration starts.
The mode number and setting number will stop blinking and remain lit, indicating the
end of registration.
* If " - - - " is displayed for both the mode number and setting number and "
" blinks in the room temperature display area, a transmission error may have occurred.
Check to see if there are any sources of noise or interference near the transmission path.
9 If you wish to continue to select other functions, repeat steps 3 to 8.
0 Complete function selection.
A Hold down the ( mode is 15 to 28) and buttons
simultaneously for at least 2 seconds.
FILTER
After a while, the function selection screen will disappear and the air condi-
tioner OFF screen will reappear.
* Do not operate the remote controller for at least 30 seconds after completing
function selection. (No operations will be accepted even if they are made.)
Note
If a function of an indoor unit is changed by function selection after installation is complete, make sure that a " " mark, etc., is given in the "Check" column of Table
1 to indicate the change.
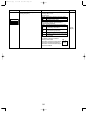
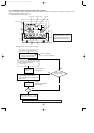
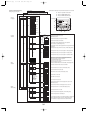
Refrigerant address
display section
Unit number
display section
Mode number
display section
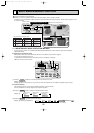
00 refrigerant address
Indoor unit
Fan draft
Remote controller
Unit number 01 Unit number 02
Outdoor unit
Designate operation
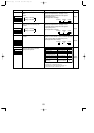
Example) When the refrigerant address is set to 00 and the unit number is 02.
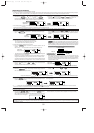
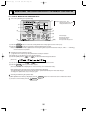
Mode number
display section
Mode number 02 = Indoor temperature detection
Setting number display section
Setting number 3 = Remote controller built-in sensor
Setting number 1 = Indoor unit operating average
TEST
FUNCTION
SELECTION
TEST
OCH429--4.qxp 07.11.20 9:20 AM Page 91