


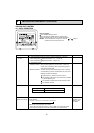
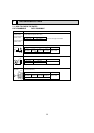

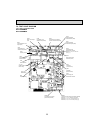
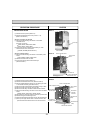

1. REMOVING THE LOWER SIDE OF THE INDOOR UNIT
FROM THE INSTALLATION PLATE
When there is removing plate
(1) Remove the corner box at right lower side of the indoor
unit and remove the removing plate from the corner box.
(Figure 3)
(2) Insert the removing plate at the back side of the corner
box to remove the indoor unit.
(3) Remove the hook by pulling the lower side of the indoor
unit down as shown in the Figure 1.
When there is no removing plate or it cannot be used for
some reason.
(1) Remove the front panel.
(2) Insert the screw driver to the corner hole at both left and
right side as shown in the Figure 2.
(3) Push it up, then pull down the lower side of indoor unit and
remove the hook.
Figure 1 Figure 2
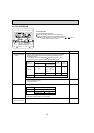
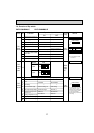
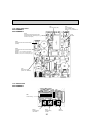
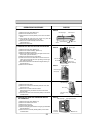
2. REMOVING THE FRONT PANEL
* Before removing the front panel, leave the open space at
upper side of the vane approximately 2 to 3 cm.
(1) Remove the 3 screw caps then remove the 3 set screws.
(Refer to the Photo 1)
(2) Remove the grille.
(3) Remove the left side of the front panel, then right side.
(4) After removing the lower side of the front panel a little,
remove it as pulling the upper side toward you.
* Please pay attention to the nozzle assembly.
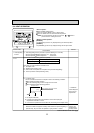
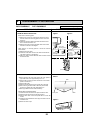
INSTALLING THE FRONT PANEL
(1) Insert the lower side of the front panel under the vane.
(2) Set the upper side of the front panel. (Figure 4)
(3) Set the lower side of the front panel then fix it with the
screws.
(4) Press the area indicated as arrow sign and set it to the air
conditioner unit.
(5) Attach the screw caps.
(4) Push
(3)
(2)
Photo 1
Figure 4
Front panel
Set screws
Figure 3
Vane
Grille
Indoor unit
removing plate
Insert
the edge
Pull
Push
Push
Down
Be careful
not to damage
the airflow
adjustment
plate with the
screw driver.
Corner box
Corner hole
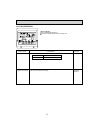
PHOTOS & ILLUSTRATIONSOPERATION PROCEDURE
2121
DISASSEMBLY PROCEDURE
8
PKFY-P06NBMU-E PKFY-P08NBMU-E
Be careful when removing heavy parts.