


OPER ATING INS TRUCTIONS
7
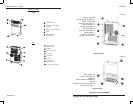
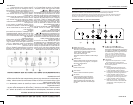
Operating Instructions
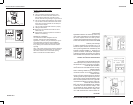
- Press the "MODE" button until the "COOL"
indicator light comes on.
- Press the ADJUST buttons " " or " " to
select your desired room temperature. The
temperature can be set within a range of
17 C-30 C/62 F-88 F.
- Press the "FAN SPEED" button to choose the
fan speed.
O O O O
- Press the "MODE" button until the "DRY" indicator
light comes on.
- Under this mode, you cannot select a fan speed or
adjust the temperature. The fan motor operates at
LOW speed.
- Keep windows and doors closed for the best
dehumidifying effect.
- Do not put the duct to window.
COOL operation
DRY operation
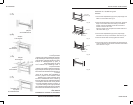
- Press the "MODE" button until the
"FAN " indicator light comes on.
- Press the "FAN SPEED" button to
choose the fan speed. The temperature
cannot be adjusted.
- Do not put the duct to window.
FAN operation
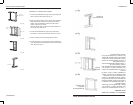
TIMER operation
AUTO operation
- When you set the air conditioner in AUTO
mode, it will automatically select cooling
or fan
only operation depending on what temperature
you have selected and the room temperature.
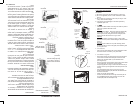
- When the unit is on, first press the
Timer button, the TIMER OFF
indicator light illuminates. It indi-
cates the Auto Stop program is
initiated.
-
- Press or hold the UP or DOWN
button to change the Auto time by
0.5 hour increments, up to 10 hours,
then at 1 hour increments up to 24
hours. The control will count down
the time remaining until start.
- The selected time will register in 5
second and the system will autom-
atically revert back to display the
p
revious temperature setting.
- Turning the unit ON or OFF at any
time or adjusting the timer setting
to 0.0 will cancel the Auto Start/
Stop timed program.
- When the malfunction (E1 or E2)
occurs, the Auto Start/Stop timed
program will also be cancelled.
When the unit is off, first press the
Timer button, the TIMER ON indic-
ator light illuminates. It indicates
the Auto Start program is initiated.
SLEEP operation
- The air conditioner will control room
temperature automatically around the
temperature point set by you.
- Under AUTO mode, you can not
select the fan speed.
Press this button, the selected temperature
will increase(cooling)
by 1 30 minutes.
The temperature will then increase
(cooling)
by another 1 after an
additional 30 minutes. This new temper-
ature will be maintained for 7 hours
before it returns to the originally selected
temperature. This ends the Sleep mode
and the unit will continue to operate as
originally programmed.
This feature is unavailabe under
FAN or DRY mode.
O O
O O
C/2 F
C/2 F
NOTE:
7 ENGLISH
INSTRUCCIONES DEL FUNCIONAMIENTO
Funcionamiento de enfriamiento – COOL
-Presione el botón “MODE” hasta que la luz
indicadora de “COOL” se ilumine.
- Presione y utilice los botones de AJUSTE
y para seleccionar la
temperatura de ambiente deseada. Se pu-
ede programar la temperatura dentro de un
rango de 17°C a 30°C / 62°F a 88°F.
- Presione el botón “FAN SPEED” para se-
leccionar la velocidad del ventilador.
Funcionamiento del deshumedecedor -
DRY
- Presione el botón “MODE” hasta que la luz
indicadora de “DRY” se ilumine.
- Bajo esta función, no se puede seleccio-
nar la velocidad del ventilador ni regular la
temperatura. El motor del ventilador funcio-
nará a velocidad baja (LOW).
- Mantenga las ventanas en las puertas cer-
radas para obtener un mejor resultado en el
retiro de humedad.
- No coloque el conducto en la ventana.
Funcionamiento automático – AUTO
- Si se coloca el equipo de aire acondiciona-
do en la función AUTO, el equipo automáti-
camente seleccionará la opción de enfria-
miento o solo de ventilador dependiendo de
la temperatura que se ha seleccionado y de
la temperatura de ambiente.
- El equipo de aire acondicionado contro-
lará la temperatura de ambiente automáti-
camente según la temperatura predetermi-
nada por el usuario.
- Bajo la función AUTO, no se puede selec-
cionar la velocidad del ventilador.
Funcionamiento del ventilador – FAN
- Presione el botón “MODE” hasta que la luz
indicadora de “FAN” se ilumine.
- Presione el botón “FAN SPEED” para se-
leccionar la velocidad del ventilador. El nivel
de temperatura no podrá regularse.
- No coloque el conducto en la ventana.
Funcionamiento del temporizador – TIMER
- Con el aparato encendido, primero pre-
sione el botón TIMER. La luz indicadora
de TIMER OFF (hora de apagado del tem-
porizador) se iluminará. Esto indicará que
el programa de apagado automático se ha
iniciado.
- Con el aparato apagado, primero pre-
sione el botón TIMER. La luz indicadora de
TIMER ON (hora de encendido del tempo-
rizador) se iluminará. Esto indicará que el
programa de encendido automático se ha
iniciado.
- Presione o mantenga presionados los bo-
tones Arriba / Abajo para cambiar la hora de
encendido o apagado automático en incre-
mentos de 0.5 horas hasta un máximo de
10 horas, y luego en incrementos de 1 hora
hasta un máximo de 24 horas. El control
efectuará un conteo regresivo del tiempo
restante hasta el inicio.
- El tiempo seleccionado quedará regis-
trado en 5 segundos y el sistema automáti-
camente se revertirá as la pantalla anterior
para mostrar la opción de temperatura an-
terior.
- Si se enciende o se apaga el equipo en
cualquier momento o si se coloca el tempo-
rizador en 0.0, se cancelará la función de
encendido y apagado automático.
- Si se presentan los errores de desperfec-
tos (E1 ó E2), el programa de encendido y
apagado automático también quedará can-
celado.
Función de ahorro – SLEEP
Presione este botón y la temperatura selec-
cionada aumentará (enfriamiento) en 1°C
/ 2ºF durante 30 minutos. La temperatura
después aumentará (enfriamiento) en 1°C
/ 2ºF adicionales después de 30 minutos
adicionales. La nueva temperatura se man-
tendrá durante 7 horas antes de retornar a
la temperatura seleccionada originalmente.
Esto nalizará la función SLEEP y el equipo
continuará funcionando según su program-
ación original.
NOTA: Esta función no se encuentra dis-
ponible bajo las opciones FAN y DRY.
7 ESPAÑOL