


49Heat & Glo • Supreme-N-I30AU, Supreme-P-I30AU • 2222-900 Rev. P • 6/12
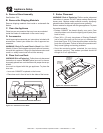
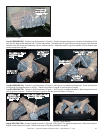
Log#3(SRV2206-702): Position Log #3 as shown in Figure 5. Position the grate tine groove, located on the bottom of the
log, over the base of the left grate tine. Pull the log forward. The back end of Log #3 rests on the log support. Bend the tab
located to the left of the pilot assembly into the vertical position. Rotate the end of Log #3 clockwise until the bottom right
corner contacts the log tab.
Figure5.PlaceLog#3
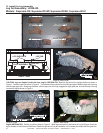
Log#5(SRV2206-704): Position Log #5 as shown in Figure 7. See Figure 6 for additional details. Mate the grate tine with
the log groove as shown. Position the tips of Log #5 on the at spots as shown in Figure 6.
Log#4(SRV2206-703): Position Log #4 as shown in Figure 6. See Figure 3 for additional references. Place the thick end
of Log #4 on the large at spot on Log #1. Rest the front end of Log #4 on the at spot of Log #2.
FLAT SPOTS
(FORLOG#6)
POINTS OF LOG REST ON
FLAT SPOTS
GRATE TINE
TOUCHES
LOG GROOVE
Figure7.PositionLog#5
Figure8.PositionLog#6
Log#6SRV(2206-706): Position Log #6 as shown in Figure 8. See Figure 7 for additional references. Rest the left end of
Log #6 on the at spot of Log #3. Position the nose of Log #6 on the fork of Log #5.
FRONT END OF LOG
RESTS ON FLAT
SPOT
REST LOG ON
LARGE FLAT
SPOT
LEFT END OF
LOG RESTS ON
FLAT SPOT
POSITION THE NOSE ON THE
FORKOFTHELOG
CORNER OF
LOG FLUSH
WITHLOGTAB
3
5
4
6
Figure6.PlaceLog#4
Figure9.LogSetInstalled
FLAT SPOTS
FORLOG#5