


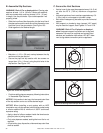
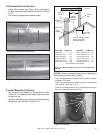

Heat & Glo • LUX60 • 4062-116 • Rev. G • 4/1144
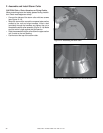
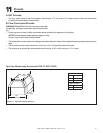
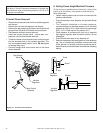
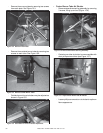
D. Install Flame Solenoid
• Remove the screw and knob from the variable regulator
and discard.
• Remove the nut from the regulator and discard.
• Remove the bag containing a washer and blue and red
plungers from the side of the fl ame control solenoid.
• Place washer on fl ame control solenoid.
• Insert the correct plunger (blue - natural gas, red -
propane) into the fl ame control solenoid.
• Thread the fl ame control solenoid with correct plunger
into the threaded hole in the variable regulator. Turn
into valve approximately two full turns. Do not tighten
or damage may occur.
• Connect orange wires from control box to the fl ame
control solenoid.
Figure 12.1 Install the Flame Solenoid
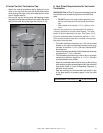
E. Setting Flame Height/Manifold Pressure
(To be done by a qualifi ed service technician.) Upon initial
power-up of this device, valve pressure must be set for
fl ame adjustment.
• Loosen output pressure tap on valve and connect with
pressure manometer.
• Press fl ame button once; fi replace will light with fl ames
on high.
• Turn solenoid clockwise to increase pressure,
counterclockwise to decrease pressure until manifold
pressure on high is 3.5 in. water column for natural gas
(NG), 10.0 in. water column for propane (LP).
• Once pressure is achieved spin jam nut on solenoid
tight against regulator face to prevent rotation. Do not
overtighten.
• Press fl ame button twice to turn fi replace off.
• Remove manometer tube and tighten or close pressure
tap. Use a commercially available, noncorrosive leak
check solution to carefully check the pressure tap for
leaks. Be sure to rinse off all leak check solution following
testing.
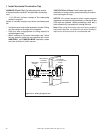
Gas Control
Valve
Variable
Regulator
Flame Control
Solenoid
Washer
Variable
Regulator
Variable
Regulator
Washer
Plunger
Jam Nut
Nut
Screw
Knob
Solenoid
Note: The fl ame solenoid is assembled and preset from
the factory. Should it become necessary to reinstall the
fl ame solenoid, refer to the follwing sections (12.D & 12.E)
for proper reinstallation.