


Heat & Glo • LUX60 • 4062-116 • Rev. G • 4/11 3
Safety Alert Key:
• DANGER! Indicates a hazardous situation which, if not avoided will result in death or serious injury.
• WARNING! Indicates a hazardous situation which, if not avoided could result in death or serious injury.
• CAUTION! Indicates a hazardous situation which, if not avoided, could result in minor or moderate injury.
• NOTICE: Used to address practices not related to personal injury.
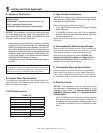
Table of Contents
A. Congratulations 2
B. Limited Lifetime Warranty 5
1 Listing and Code Approvals
A. Appliance Certifi cation 7
B. Ceramic Glass Specifi cations 7
C. BTU Specifi cations 7
D. High Altitude Installations 7
E. Noncombustible Materials Specifi cation 7
F. Combustible Materials Specifi cation 7
G. Electrical Codes 7
H. Requirements for the Commonwealth
of Massachusetts 8
User Guide
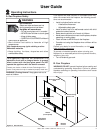
2 Operating Instructions
A. Gas Fireplace Safety 9
B. Your Fireplace 9
C. Clear Space 10
D. Decorative Doors and Fronts 10
E. Fixed Glass Assembly 10
F. Operation of the LUX60 10
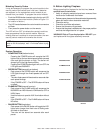
G. Remote Operation 10
H. Before Lighting Fireplace 11
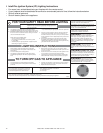
I. IntelliFire Ignition System (IPI) Lighting
Instructions 12
J. After Fireplace is Lit 13
K. Frequently Asked Questions 13
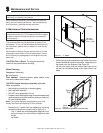
3 Maintenance and Service
A. Maintenance Tasks-Homeowner 14
B. Maintenance Tasks-Qualifi ed Service Technician 16
Installer Guide
4 Getting Started
A. Typical Appliance System 20
B. Design and Installation Considerations 21
C. Tools and Supplies Needed 21
D. Inspect Appliance and Components 21
5 Framing and Clearances
A. Select Appliance Location 22
B. Assemble Steel Stud Kit 22
C. Construct the Appliance Chase 23
D. Clearances 23
6 Termination Locations
A. Vent Termination Minimum Clearances 25
7 Vent Information and Diagrams
A. Approved Pipe 27
B. Vent Table Key 27
C. Use of Elbows 27
D. Measuring Standards 27
E. Vent Diagrams 28
8 Vent Clearances and Framing
A. Pipe Clearances to Combustibles 31
B. Wall Penetration Framing 31
C. Install the Ceiling Firestop 32
D. Install Attic Insulation Shield 33
9 Appliance Preparation
A. Secure and Level the Appliance 34
10 Install Vent Pipe
A. Assemble Vent Sections 35
B. Assemble Slip Sections 36
C. Secure the Vent Sections 36
D. Disassemble Vent Sections 37
E. Install Metal Roof Flashing 37
F. Assemble and Install Storm Collar 38
G. Install Vertical Termination Cap 39
H. Heat Shield Requirements for Horizontal
Termination 39
I. Install Horizontal Termination Cap 40
11 Shrouds
A. HHT Shrouds 41
B. Field Constructed Shrouds 41
12 Gas Information
A. Gas Pressure 43
B. Gas Connection 43
C. High Altitude Installations 43
D. Install Flame Solenoid 44
E. Setting Flame Height/Manifold Pressure 44
13 Electrical Information
A. Wiring Requirements 45
B. Electrical Service and Repair 45
C. Junction Box Installation 46
14 Wall Finishing
A. Standard 1/2 in. (13 mm) Sheetrock 47
B. Additional Decorative Finishing up to 1 in.
(25 mm) Thick 48
C. Additional Decorative Finishing over 1 in.
(25 mm) Thick 48
15 Appliance Setup
A. Remove Glass Assembly 49
B. Clean the Appliance 49
C. Air Shutter Access & Adjustment 49
D. Install Glass Rock 51
16 Troubleshooting
A. IntelliFire (IPI) Ignition System 52