


complaint associated with the anode rod is a “rotten egg
smell” produced from the presence of hydrogen sulfide gas
dissolved in the water. Do not remove this rod perma-
nently as it will void any warranties, stated or implied. A
special anode can be ordered if water odour or discoloura-
tion occurs. This rod may reduce, if not eliminate, water
odour problems. The water supply system may require
special filtration equipment from water conditioning compa-
ny to successfully eliminate all water odour problems.
Artificially softened water is exceedingly corrosive because
the process substitutes sodium ions for magnesium and cal-
cium ions. The use of a water softener may decrease the life
of the water heater tank. The anode rod should be inspect-
ed every year. If the rod is more than 50% depleted, the
anode rod should be replaced.
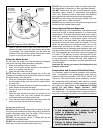
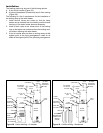
To replace the anode:
1. Turn off gas supply to the water heater.
2. Shut off the water supply and open a nearby hot water
faucet to depressurize the water tank.
3. Drain approximately 20 litres (5 US gallons) of water
from tank (Refer to “Draining and Flushing” for proper
procedures.) Close drain valve.
4. Remove old anode rod.
5. Use Teflon® tape or approved pipe sealant on threads
and install new anode rod.
6. Turn on water supply and open nearby hot water faucet
to purge air from water system.
7. Restart the water heater as directed under “Operating
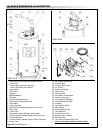
Your Water Heater.” See the “Repair Parts Illustration”
for anode rod location.
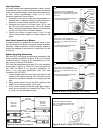
Draining and Flushing
It is recommended that the tank be drained and flushed
every 6 months to remove sediment that may build up dur-
ing operation. The water heater should be drained if being
shut down during freezing temperatures. To drain the tank,
perform the following steps:
1. Turn off the gas to the water heater at the manual gas
shut-off valve.
2. Turn off the electrical supply to the water heater.
3. Close the cold water inlet valve.
4. Open a nearby hot water faucet.
5. Connect a hose to the drain valve and terminate it to an
adequate drain.
Note: The drain hose should be rated for at least 93°C
(200°F). If the drain hose does not have this rating, open the
cold water inlet valve and a nearby hot faucet until the water
is no longer hot.
6. Open the water heater drain valve and allow all the
water to drain from the tank. Flush the tank with water
as needed to remove sediment.
7. Close the drain valve, refill the tank, and restart the
heater as directed under “Water Heater Operation”.
If the water heater is going to be shut down for an extended
period, the drain valve should be left open.
Important: Condensation may occur when refilling the tank
and should not be confused with a tank leak.
Routine Preventative Maintenance
Important: If you lack the necessary skills required to prop-
erly perform this visual inspection, you should not proceed,
but get help from a qualified service technician.
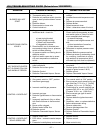
At least annually, a visual inspection should be made of the
venting and air supply system, piping systems and main
burner. Check the water heater for the following:
• Build up of soot and carbon on the main burner. Check
for a soft blue flame.
• Leaking or damaged water and gas piping.
• Presence of flammable or corrosive materials in the
installation area.
• Presence of combustible materials near the water
heater.
• Verify proper operation after servicing this water heater.
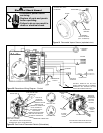
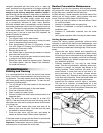
Venting System and Blower
Inspect the venting system periodically (minimum twice
annually) to make certain that the vent passageways, vent
terminal and blower assembly are free and unobstructed.
Ensure that any condensate is draining freely. Clean as nec-
essary.
• Inspect the vent piping, elbows and connections for
signs of stress cracking or deterioration. Make certain
the venting is free to move and that all pipe hangers and
isolation supports are properly positioned and securely
attached. Replace any broken components and rectify
any installation problems.
• Particles, especially lint, can clog the vent blower
wheel. This can be problematic, especially where con-
densation is present, as particles may adhere to the
venting surfaces. These conditions can result in nui-
sance failures. In areas that have a high level of air-
borne particulate (e.g. lint, sawdust, process smoke,
laundry areas, etc.) inspection and cleaning may need
to be done more frequently. Clean the blower wheel and
venting as required to ensure proper performance.
• Inspect the flue collector area for signs of corrosion.
This can be an indication of contaminated air, a wet
environment, poor burner set up, or high levels of con-
densation occurring at the flue collector. Determine and
correct any poor operating conditions.
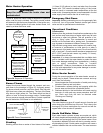
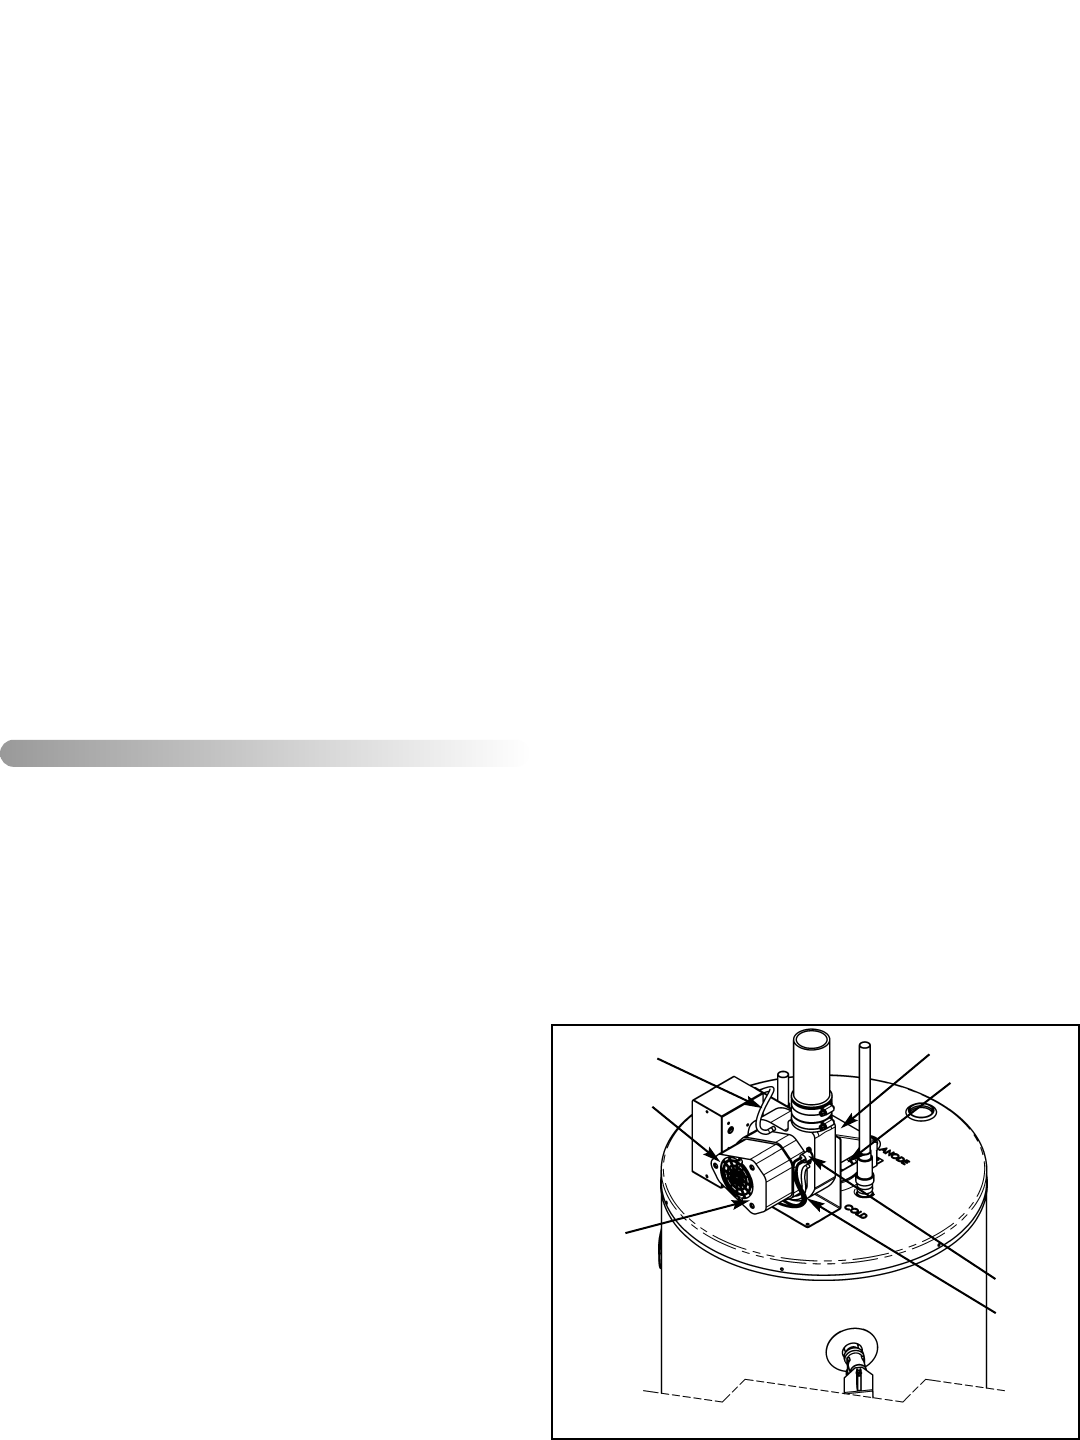
VI) MAINTENANCE
LIMIT
SWITCH
WIRES
DRAFT
DIVERTER
AIR PRESSURE
TUBING
MOTOR
VENTILATION
OPENINGS
BLOWER
MOTOR
AIR INTAKE
OPENING FOR
DRAFT DIVERTER
LIMIT
SWITCH
Figure 26 Blower Maintenance
– 24 –