


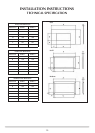

14
INSTALLATION INSTRUCTIONS
SITE REQUIREMENTS/INSTALLATION
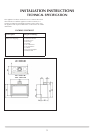
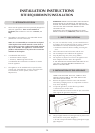
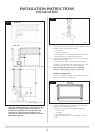
5. APPLIANCE LOCATION
5.1 Please note this appliance has been specifically designed for
stud work applications. There are two methods of
installation, see Installation Instructions 3.2 Frame, 3.3
Edge
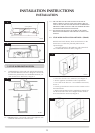
5.2 Thisappliancemuststandonanon-combustiblehearth/
platform that is at least 12mm thick.
NOTE: It is recommended you construct the back panel
of the fireplace from natural materials cut into three or
more sections to prevent cracking. Resin-based materials
may not be suitable. This appliance is an effective heat
producer and attention must be paid to the construction
and finish of the fireplace.
5.3 A combustible shelf must be:
• maximum150mmindepth
• minimum,400mmhighabovethefire
A combustible side wall must be a minimum of 150mm
from the appliance.
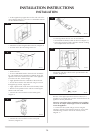
5.3 This appliance can be installed with an up and out flue
(verticalwall-horizontalflue)orwithaverticalfluewith
roof termination (see flue options, Section 2 Site
Requirements).
IMPORTANT: REFERTODATABADGEANDTECHNICAL
SPECIFICATIONATTHEFRONTOFTHEMANUALTO
ENSURETHEAPPLIANCEISCORRECTLYADJUSTEDFOR
THEGASTYPEANDCATEGORYAPPLIEDINTHE
COUNTRYOFUSE.
FORDETAILSOFCHANGINGBETWEENGASTYPES
REFERTOSECTION10,SERVICING,‘REPLACINGPARTS’.
1. SAFETY PRECAUTIONS
1.1 For your own and other’s safety, you must install this stove
according to local and national codes of practice. Failure to
install the stove correctly could lead to prosecution:
• Readtheseinstructionsbeforeinstallingandusingthis
stove.
1.2 These instructions must be left intact with the user.
1.3 Do not attempt to burn rubbish on this appliance.
1.4 Keepallplasticbagsawayfromyoungchildren.
1.5 Do not place any object on or near to the appliance and
allow adequate clearance above the appliance.
IFTHEAPPLIANCEISEXTINGUISHEDORGOESOUTIN
USE,WAIT3MINUTESBEFOREATTEMPTINGTO
RELIGHTTHEAPPLIANCE.
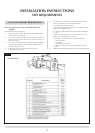
2. INSTALLATION OF THE APPLIANCE
THEREISANOPTIONALDUCTKIT,CODENo.8572
WHICHCANBEFITTEDATTHESAMETIMEASTHE
APPLIANCEINSTALLATION.
2.1 Remove the appliance from the carton and discard all
unnecessarypackaging.Ensurenocomponentsarethrown
away when unpacking.
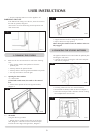
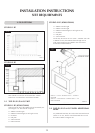
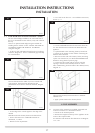
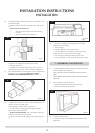
2.2 To open the glass door, use the allen key provided:
• Releasethetwowindowlocks
The lock needs to be moved from shut to open towards the
outer edge of the glass door, Diagram 1
1
AR1860
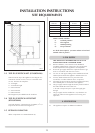
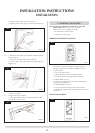
2.3 The gas supply enters the fire through a silicon panel on the
floor under the access panel, Diagram 2:
• Slitwithasharpknifebeforebringingthroughthesupply
pipe, Diagram 3