


www.fmiproducts.com
125160-01A 23
1/2" AWAY
FROM EDGES
1/2" MORTAR
BEAD TYPICAL
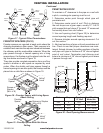
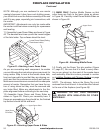
Hearth section shown prepared
for Right Side position
APPLY MORTAR
BEAD TO ALL
MATING SURFACES
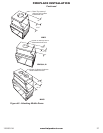
Side Wall shown prepared for Right
Side Air Access.
For Left Side, bead opposite side.
1/2" AWAY
FROM EDGES
Two 26 ga. Ember
Protectors required
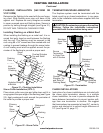
Left Side Hearth 2
nd
Right Side Hearth 1
st
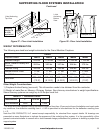
Model W
MM33 37"
MM39 43"
MM44 48"
MM49 53"
W
28"
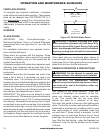
Apply mortar
between joints
12" Long Rebar
you can nudge them in between openings to achieve
the precision you need in making component adjust-
ments. Once you have removed any shims, you will
want to cover any gaps that may have resulted with
the mortar.
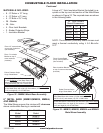
Assembly Instructions
1) Place the hearth base on top of your non-combus-
tible oor or metal base. For concrete slabs, support-
ing oor needs to be rated at ASTM 90.
a) Combustible Floor Installations: Mix up a
batch of mortar and adhere hearth slabs to the
cement board (see Figure 32 & 33, page 21). All-
thread rods should stick up through the holes on
the hearth slabs.
b) Non-combustible Floor Installations: Draw
an outline of the hearth area based on the dimen-
sions shown in pages 4 and 5. Position Hearth
slabs and mark rebar center locations. Drill 4
inches using Roto-hammer into concrete slab
and secure the 8 pieces (10 pieces for MM63) of
12" long rebar with epoxy. See Figure 34 & 35.
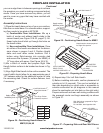
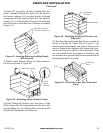
2) Mix a batch of mortar and prepare Right Side
Hearth bottom surface to be bonded as shown in Fig-
ure 36.
3) Align Right Side Hearth to the outline created. The
overall width should allow for an approximate gap of
1/8" between slabs for the additional mortar to unite
the remaining slab. Check for surface atness, level
if necessary.
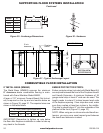
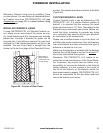
FIREPLACE INSTALLATION
Continued
Figure 34 - Positioning Hearth Base For
MM33,39,44,49
Figure 36 - Preparing Hearth Base
Figure 37 - Preparing Side and Rear Wall Pieces
4) Repeat step 3 for Left Side Hearth.
5) Before installing side walls, conrm placement of
outside air kit (if required). This can be installed ei-
ther side depending on which side is accessible to
outside combustion air (all diagrams in this manual
show the combustion air inlet hole on the right side).
Prepare side wall and rear wall mating surfaces with
the prepared mortar and begin assembly as shown
in Figure 37.
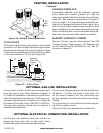
Figure 35 - Positioning Hearth Base for MM63
Center Hearth 2
nd
Left Side Hearth 3
rd
Right Side
Hearth 1
st
Apply mortar
between joints
28"
67"