


8
Operating Instructions
For Your Safety, Read Safety Precautions And
Lighting Instructions Before Operating
A) Make sure the pilot is lit.
B) Turn gas control knob COUNTER CLOCKWISE to ON.
C) Flip the burner switch to ON.
D) Turn HI/LO knob to the desired ame height.
E) Turn on all electrical power to the unit.
NOTE: Check that all burner holes are lit.
TURN OFF UNIT:
Flip switch to OFF to turn off burners only.
If the replace is to be turned off for the season, or for servicing, turn the gas shut off valve to OFF. If
the unit is going to be serviced, turn off the electrical power to the unit as well.
NOTE: When the unit is turned on for the rst time, it should be turned onto high, with the fan OFF,
for the rst two to four hours. This will cure the paint, logs, gasket material, and other products used
in the manufacturing process. It is advised that a door or window be opened, as the unit will start to
smoke, which can irritate some people. After the unit has gone through the rst burn, turn the unit OFF,
including the pilot, and let the unit get completely cold. Then remove the glass and clean it with a good
gas replace glass cleaner, available at your local Enviro dealer. See “DOOR REMOVAL” and “CLEANING THE
GLASS” sections.
REMOTE CONTROLS - OPTIONAL:
This replace can use an optional remote control or an optional cordless wall thermostat. If either of
these are to be used to control the replace for the majority of the time, leave the ON/OFF switch (on the
control panel) in the remote/thermostat position. Consult the instructions included with the remote/wall
thermostat for operation guidelines.
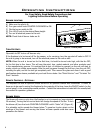
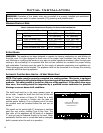
BLOWER SPEED:
The blower will come on only when the replace is up to temperature (approximately
20 minutes). Turning the fan control knob will change the speed of the fan. To turn
the blower off, turn the knob COUNTER-CLOCKWISE until it “clicks” off (Figure 6).
It is advisable not to operate the blower below
1
/3 speed as it puts a strain on the
windings of the blower and running the blower at lower speeds could also cause
premature fan failure.
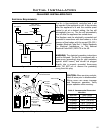
Figure 5. Control panel.
Figure 6. Fan control.
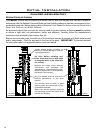
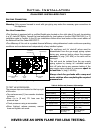
BURNER LIGHTING: