


14
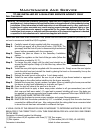
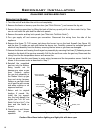
Install sealed throat connector or
flashing to prevent leakage of room air
up through chimney.
DV Only: Before installing vent
liners, mark each liner on both ends
to designate which is the intake and
the exhaust.
Measure the height of the chimney
beforehand and purchase the
appropriate kit. Never attempt to over-
stretch a flexible liner to accommodate
the height of the chimney.
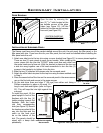
Any flue damper must be removed or
blocked permanently in the open
position.
The chimney must be clean, in good
working order and constructed of non-
combustible materials.
Make sure that all chimney cleanouts
are tight fitting and will not permit air to
leak into the chimney
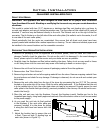
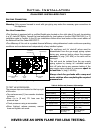
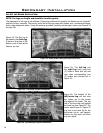
Initial Installation
QUALIFIED INSTALLERS ONLY
VENTING FIREPLACE INSERTS:
The ENVIRO SIENNA may be installed and vented into any solid fuel replace that has been installed in
accordance with the National, Provincial/State and local building codes and has been constructed of non-
combustible materials. Before starting refer to PREPARING YOUR SIENNA FOR INSTALLATION and CONVERTING A
DIRECT VENT FIREPLACE TO A B-VENT FIREPLACE.
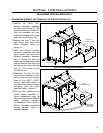
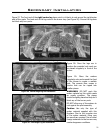
An approved chimney liner and rain cap must be used. A throat connector or ashing must be installed
to ensure a tight seal, top performance, safety and efciency. Carefully follow the manufacturer’s
instructions that accompany the chimney liner kit.
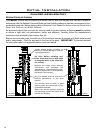
Remove the vent collar plate from the top of the insert and connect it securely with sheet metal screws
and/or hose clamps. Check for any tears in the liner at this point. IMPORTANT: The screws that hold
the vent collar plate in its approved position must be installed.
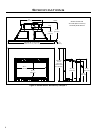
Figure 12: Installation of Sienna DV and BV.