


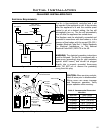

Secondary Installation
QUALIFIED INSTALLERS ONLY
REPLACING THE BLOWER:
1. Turn the unit off and allow the unit to cool completely.
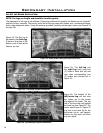
2. Remove the fascia or louvers, open the door (see “DOOR REMOVAL”), and remove the log set.
3. Remove the log support tray by lifting the back of the tray up and pull it out from under the lip. Take
care to not knock the pilot and the side brick panels.
4. Remove the centre and top brick panels (see “REMOVING THE BRICK PANEL”).
5. Turn gas supply off and remove gas connection. Disconnect the wiring from the side of the
appliance.
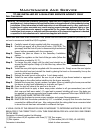
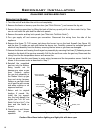
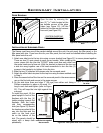
6. Remove the three (3) T-20 screws just above the burner top on the back rewall (see Figure 18)
and the two (2) screws on each side below the burner top. Carefully remove the complete gas and
electrical tray assembly from the rebox, ensuring that no wires or gas lines are damaged.
7. Remove the blower and housing from the gas tray assembly by removing the three (3) fastening screws
located on the back of the gas tray assembly. Pull the fan out from under the gas tray. Disconnect the
wiring from the fan temperature sensor and remove fan.
8. Hook up wires from the new blower to main wiring harness and fan temperature sensor. Install the
blower in the reverse order as described in Step 7.
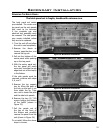
Blower / Fan
Gas & Electrical
Tray Complete
Burner Top with
Grate Attached
Log Support
Tray
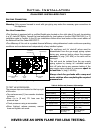
Caution: Bleed lines before lighting and light pilot with door open
Figure 18: Removing burner and gas tray.
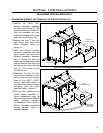
6. Reinstall the completed
gas tray into the rebox,
being careful not to
damage any wires or gas
lines. Properly secure
the gas tray assembly in
the rebox. Hook up gas
lines and wiring harness.
Perform a gas leak check
on all gas line with a soap
and water solution or an
approved method.
7. Return unit to original
location if moved. Re-
install the log support
tray, the brick panels, the
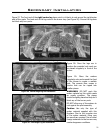
logset (see “LOG SET AND
EMBER INSTALLATION”), the
door and the fascia or
louvers.
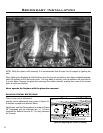
8. Check burner and blower
assembly for proper
operation.
18