


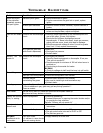
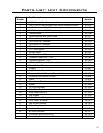

19
Secondary Installation
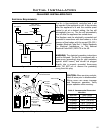
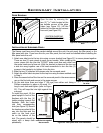
Figure 23: Filler panel with trim installation.
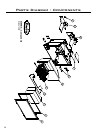
DOOR REMOVAL:
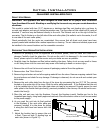
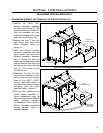
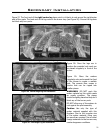
Figure 19: Top bolts for glass door.
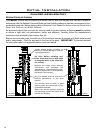
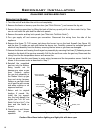
Figure 20: Bottom hooks for glass
door.
Open the door by removing the
two (2)
5
/16’’ bolts located at the
top outside corners of the glass
frame (see Figure 19). Lift the
bottom of the door up and remove
from unit (see Figure 20).
CAUTION GLASS MAY
SEPARATE FROM DOOR.
INSTALLATION OF SURROUND PANEL:
The Sienna must have one of the panels installed around the unit; the unit panel, the ller panel, or the
ller panel with trim. If you have trim for your ller panel, the trim must be installed before installing the
ller panel onto the unit.
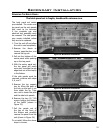
1. Attach one side trim to the top trim using a corner bracket (see Figure 21) to secure pieces together.
Figure 22: Screw to
hold the trim against
the surround.
Surround Panel
Side
Trim
#8 screw
Surround
Panel
Figure 21: Corner brackets
for trim.
There are two (2) main pieces to each corner bracket. When installing the
corner pieces into the trim the “B FACE” sides must face each other and
the screw heads are to face out. With the bracket in place and the top and
a side trim snug together use a at head screwdriver to turn the two (2)
screws in the bracket in to tighten it into the trim.
2. Slide the two (2) attached trim pieces onto the surround panel.
3. Attach the other side trim piece to the top trim using the same method used
in Step 1.
4. Place the second side of the trim on the surround panel in the same manner
use on the rst side and secure in the same manner.
5. On the side trims there are holes 2” (50 mm) from either end. Using a
Phillips screwdriver to place a #8 screw 1”
long in each hole and tighten (refer to Figure
22). This will keep the trim tight against the
surround.
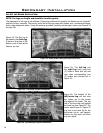
To install the panel, lift the
panel upright in front of the
replace with the four (4)
hooks pointing towards the
replace. Slide the hooks
into their corresponding
slots (see Figure 23). Ensure
the hooks are pushed all the
way into the slots and the
notch on the hook must
be on the bottom of the
slot. The panels should be
wiped with a damp cloth
periodically.