


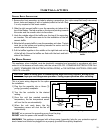
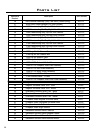


The fan kit is pre-installed into the left shroud that
comes with your unit. If a decorative set of shroud
plates is purchased, the fan assembly must be
removed from the shroud to installed the decorative
plates (refer to “REMOVAL OF THE SHROUDS - INSERT”).
1) Disconnect all electrical connections for the fan
kit.
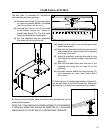
2) Remove the four (4) T-20 screws that hold the
fan mounting plate to the shroud. If the fan
needs to be removed from its mounting plate,
use a ” socket and wrench to remove the six
(6) bolts holding the fan housing to the plate.
3) Remove the fan control knob and nut from the
front of the shroud and pull the controls out the
back.
4) Slide the plug out the front of the pod.
5) Install the fan kit into the new shroud by
following steps 1 through 4 in reverse order.
Refer to FAN WIRING DIAGRAM to ensure the fan is
reconnected properly.
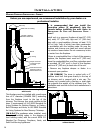
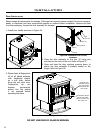
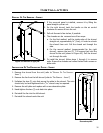
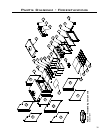
FAN REMOVAL - INSERT:
Figure 42: Insert Unit with Fan.
Installation
Refer to FAN WIRING DIAGRAM before installing your optional fan
kit.
1. Remove the fan assembly from the box and inspect for any
damage to the assembly. If damage is noticed call your
dealer, distributor or courier company and have components
replaced before installing kit.
2. Remove the knock out at the bottom of the back panel of the
appliance by using a at head screwdriver as a lever, hook
the tip of the screwdriver under the panel beside the tabs and
push the panel out.
3. Install two (2) T-20 screws into the top two (2) holes. Place
the blower assembly over these two (2) screws.
4. Ensure the temperature sensor will touch the unit when
mounted. If it does not touch, adjust the sensor so it does.
Tighten the two (2) top screws and install the two (2) bottom
screws and tighten.
5. Plug the fan assembly in and check for proper operation.
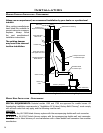
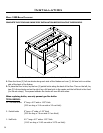
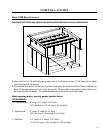
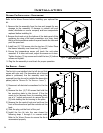
OPTIONAL FAN INSTALLATION - FREESTANDING:
Figure 41: Back View of Freestanding
Unit with Fan Kit.
34