


23
Installation
INSTALLATION OF A LISTED, FACTORY BUILT CHIMNEY - FREESTANDING:
This is a generic set of instructions; always follow the chimney manufacturer’s instructions
explicitly. Also refer to “RECOMMENDED HEIGHTS FOR FLUE PIPE”.
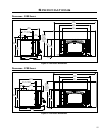
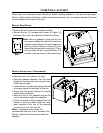
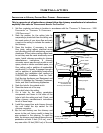
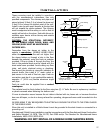
1. Set oor protector and stove in location in accordance with the “CLEARANCES TO COMBUSTIBLES - 1200
Hearthpad
Floor
Pedestal
Woodstove
Optional
fan
Outside air connection
through wall or floor
Ceiling support
Ceiling
Radiation shield
Insulated chimney
Rain cap/
Spark arrestor cap
Roof flashing
Roof
Attic
radiation shield
Minimum air space in
accordance with
chimney manufacturer.
Chimney
connector
Storm Collar
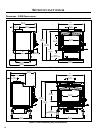
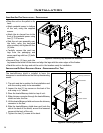
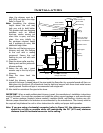
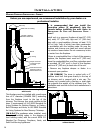
Roof
Ridge
2 ft (0.6 m)
Minimum
3 ft (0.9 m)
Minimum
Within10 ft (3 m)
FREESTANDING” or “CLEARANCES TO COMBUSTIBLES -
1700 FREESTANDING”.
2. Mark the position for the ceiling hole by
suspending a plumb bob from the ceiling over
the exact center of your stove ue and mark
a spot on the ceiling to indicate the center of
the chimney.
3. Move this location, if necessary, to avoid
oor joists, ceiling rafters, electrical wiring
and plumbing while still maintaining required
clearances. If oor joists or ceiling rafters must
be cut they must be made structurally sound
again. Install chimney according to chimney
manufacturers instructions. A chimney
connector cannot pass through an attic or roof
space, closet or similar concealed space, or a
oor, ceiling, wall or partition of combustible
construction. In Canada, if passage through a
wall or partition of combustible construction
is desired, the installation shall conform to
CAN/CSA-B365 Installation Code for Solid-
Fuel Burning Appliances and Equipment and
NFPA 211 Standard for Chimneys, Fireplaces,
Vents, and Solid Fuel-Burning Appliances.
4. Mark the hole for the outside air kit.
5. Move the stove out of the way.
6. Cut a pilot hole in the ceiling.
7. Cut a hole for the ceiling penetration
components and frame in the sides of the
hole in both the ceiling and roof. Check, and
follow chimney manufacturer’s instructions
for all of these steps.
8. Install the support box and chimney through
the roof. Install the slip section for the
chimney connector.
9. Slip the roof ashing over the chimney and
secure to the roof, being careful to keep the
pipe centered in the opening. To meet the
code, the chimney must extend above the roof
penetration at least 3 feet (91.4 cm), and in
any area within 10 feet (304.8 cm) of the roof
Figure 23: Standard Vertical Installation.
Figure 22: Roof Clearances.