


4
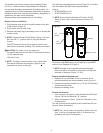
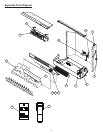
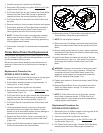
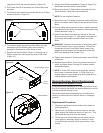
Figure 3
On
Button
Off
Button
Battery Cover
Battery
The remote control has a range of approximately 50 feet
(15.25 m). It does not have to be pointed at the replace
and can pass through most obstacles (including walls). It is
supplied with one of 243 independent frequencies to prevent
interference with other units and the frequency designation is
indicated on the back of the transmitter.
Replace battery when needed with a 9 volt battery.
Remote Control Installation
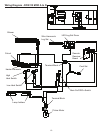
1. Plug replace cord set into the outlet located on the side
of the receiver (Figure 2).
2. Plug receiver into the wall outlet.
3. Remove the plastic tag at the battery cover, to activate the
remote control.
!
NOTE: Fireplace Power On/Off Switch (Figure 1-A) must
be in the On (“ I ”) position prior to using the Remote
Control.
ON/OFF Remote Control may be used to control most
other electrical devices including TV’s, stereos and lamps.
CAUTION: For indoor use in dry areas only.
For use on electrical devices with 15 amp resistive load or
1/3 HP inductive load.
120 volt AC only.
!
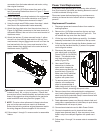
NOTE: The plug-in remote version may include either
the remote transmitter as pictured on page 3 or the
transmitter as shown to the right.
The following integrated remote control (Figure 3) is included
with the models and MOD levels specied below:
Used in:
DFI2309 MODs C to D•
DFI2310 MOD A2 to D•
!
NOTE: Ensure that the replace’s 3 Position On/Off
Switch (Figure 1-B) is set to the remote control (“ II ”)
setting.
To operate: push ON button to turn replace on; push OFF
button to turn replace off (Figure 3).
!
NOTE: Remote control operates main power supply.
Heat must still be controlled by Low Heat and High Heat
switches on replace (Figure 1-C & D).
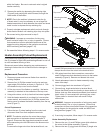
Battery Installation/Replacement
1. Depress tab on the battery cover on the back of the
remote transmitter and remove battery cover (Figure 3).
2. Properly orientate and install one (1) 12 Volt (A23) battery
into the remote control.
3. Replace the battery cover.
Remote Initialization
1. From an power off position, place the Main On/Off Switch
(Figure 1-B) into the Remote (“ II ”) position.
2. Within 10 seconds of step 1, press the ON button on the
remote control.
This will synchronize the remote control transmitter with the
receiver within the replace.
!
NOTE: You will only have 10 seconds to perform the last
step. If this is not completed within 5-10 seconds, the
procedure will have to be repeated.