


21
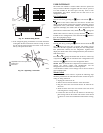
Triple Evacuation
Method
The triple evacuation method should only be used when vacuum
pump is only capable of pumping down to 28 in. of mercury
vacuum and system does not contain any liquid water.
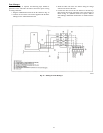
Refer to Fig. 37 and proceed as follows:
1. Pump system down to 28 in. of mercury and allow pump to
continue operating for an additional 15 minutes.
2. Close service valves and shut off vacuum pump.
3. Connect a nitrogen cylinder and regulator to system and
open until system pressure is 2 psig.
4. Close service valve and allow system to stand for 1 hr. Dur-
ing this time, dry nitrogen will be able to diffuse throughout
the system absorbing moisture.
5. Repeat this procedure as indicated in Fig. 37. System will
then be free of any contaminants and water vapor.
CHECK FOR TIGHT, DRY SYSTEM
(IF IT HOLDS DEEP VACUUM)
EVACUATE
BREAK VACUUM WITH DRY NITROGEN
WAIT
EVACUATE
RELEASE CHARGE INTO SYSTEM
BREAK VACUUM WITH DRY NITROGEN
EVACUATE
WAIT
A95425
Fig. 37 -- Triple Evacuation Method
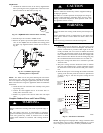
To Start the Unit:
1. If the outdoor unit is equipped with a crankcase heater, turn
on the indoor and outdoor disconnect switches to supply
power the system 12 hours before starting the system.
2. Release charge into the system by opening (back--seating)
liquid and suction line service valves.
3. Set the wireless remote control or wired remote control be-
low ambient temperature. Operate the unit for 15 minutes.
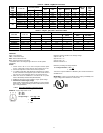
4. Refer to Table 6 to determine if additional charge is re-
quired. Also, if you have a long line application, refer to the
Duct Free Long Line Application Guide to determine the
additional charge that is required beyond 25 ft (7.6 m).
5. Calculate the total additional charge required and weigh in.
6. Charge should be added as liquid (not gas) slowly and care-
fully to low side to avoid liquid slugging.
7. Start unit with operation test. In test mode the unit will run
in cooling and heating (on heat pumps) regardless if there is
demand or not.
Set Unit in Test Mode Using Wireless Control
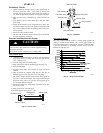
Turn power on to the unit. Insert batteries in remote control. Press
the
and the buttons on the remote control for 5 seconds.
The remote control will be cleared and the time segment will
display the Src1=service test mode. Press the
button to
transmit the service test signal to the unit. After the test has
completed press the
button to leave the test menu.
NOTE: When 30 seconds have elapsed and no buttons have been
pressed, the remote control will automatically exit the test menu
and resume its normal operation.
SetUnitinTestModeUsingWiredControl
There is a hidden service test mode that is initiated through a
combination of button presses when the remote is off. The
following combination must be pressed within a 6 second period:
“DOWN--FAN--UP--FAN--MODE”
Once in service test mode, the service test mode message will be
sent and “Sr” will be displayed in the temperature icons until the
“DOWN” button is pressed.
During Service Test mode, all the icons are off. the only button
that is active is the “DOWN” button.
To cancel Service Test mode, press the “DOWN” button to send a
normal message with “OFF” mode.
Service Test mode automatically times out after 30 minutes and the
remote will operate normally.
Test Mode Sequence of Operation
Once unit is in TEST MODE, all remote control messages are
ignored except for a message to turn the unit OFF. Buzzer will
beep twice.
When in TEST MODE, the unit will operate as follows:
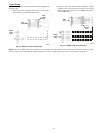
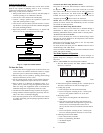
1. The unit Status (Green) and Timer (Yellow) LEDs will
blink every 2 seconds
GREEN
YELLOW
A09594
Fig. 38 -- LED Display
2. Indoor fan will operate according to user – selected speed. If
Autofanisselected,thefanwillruninHighspeed
3. Cooling only system
a. Unit will operate in cool mode with demand
b. Louver will operate according to user -- selected posi-
tion or in cool position if louvers are set to Auto
4. Heat pump system
a. Unit will run in cooling mode with demand for 3
minutes
b. Unit will run in heat pump mode with demand for 2
minutes or until indoor coil temperature is greater than
104_F(40_C). If coil temperature reaches 104_F
(40_C), the unit will run in cool mode until test mode is
exited.
c. Louver will operate according to user -- selected posi-
tion or in cool/heat position if louvers are set to Auto.
5. Following will cancel Test Mode:
a. Unit is turned off by controller
b. Power is cycled during Test Mode
c. 30 minutes elapsed
d. Fail Mode