


BERNINA
®
Embroidery Module/Machine
MASTERING YOUR BERNINA
®
EMBROIDERY MODULE/MACHINE 2/06
10
Mastering
Your
BERNINA
®
©2006 BERNINA® of America, Inc. Permission to copy granted only to Authorized BERNINA
®
Dealers
artista & aurora Embroidery Module Set Up
• Turn machine OFF
(Note: artista 630E/640E/730E ONLY may start with
machine ON)
• Module Connection Cable
- Stored on the bottom back edge of the module
- Make sure the FLAT side of the cable plug is to the FRONT
• Attaching the Module
- Place the machine on a flat surface (such as a table or
countertop)
- Place the module on the machine behind the free arm
- Slide module on from left until lugs engage in base plate
• Removing Module
- Turn machine OFF
(Note: artista 630E/640E/730E ONLY may leave
machine ON)
- Remove cable plug from sewing/embroidery computer
- Lift module slightly (do NOT lift using the embroidery arm!)
and slide the module to the left
Prepare for Embroidery
• Presser Foot
- Attach Embroidery Foot #15 or #26 to the machine (artista
& aurora only)
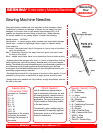
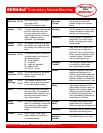
• Needles
- Use the proper needle for the thread and fabric being used
- Insert a new needle at the beginning of each project
- Needle should be in the highest position when attaching
the hoop to prevent snagging fabric and/or bending needle
• Straight Stitch Plate (optional accessory for artista & aurora)
- Reduces flagging of fabric, resulting in improved stitching
• Bobbin
- Use the Embroidery (gold latch) Bobbin Case (artista 640E
& 730E), threading the “pigtail” for increased bobbin
thread tension
- Thread the “finger” of the bobbincase (artista 630E &
aurora 430E & 440E) for increased bobbin thread tension
Getting Started
Notes