


RWB 6104 BAFG R02 Page 13
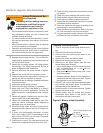
Start up burner/set combustion
For R7184 primary controls, see Technician’s
Quick Reference Guide, part number 61351 for
special pump priming sequence.
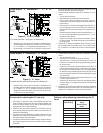
Prepare for combustion tests by drilling a ¼” sam-
pling hole in the fl ue pipe between the appliance
and the barometric draft regulator.
Initial air adjustment — Using a smoke tester, ad-
just the air shutter (and air band, if necessary) to
obtain a clean fl ame. Now the additional combus-
tion tests with instruments can be made
Set combustion with instruments
Allow the burner to run for approximately 5 to 10
minutes.
Set the stack or over-fi re draft to the level specifi ed
by the appliance manufacturer.
Natural Draft Applications; typically over-fi re
draft is -0.01” or -0.02” w.c.
Direct Venting; typically may not require draft
adjustment.
High Effi ciency/Positive Pressure Appliances;
also vary from traditional appliances (see manu-
facturer’s recommendations).
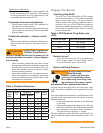
Follow these four steps to properly adjust the burn-
er:
Step 1: Adjust the air shutter/band until a trace of
smoke is achieved.
Step 2: At the trace of smoke level, measure the
CO
2
(or O
2
) . This is the vital reference
point for further adjustments. Example:
13.5% CO
2
(2.6% O
2
)
Step 3: Increase the air to reduce the CO
2
by
1.5 to 2 percentage points. (O
2
will be in-
creased by approximately 2.0 to 2.7 per-
centage points.) Example: Reduce CO
2
from 13.5% to 11.5% (2.6% to 5.3% O
2
).
Step 4: Recheck smoke level. It should be Zero.
This procedure provides a margin of
reserve air to accommodate variable
conditions.
If the draft level has changed, recheck
the smoke and CO
2 levels and readjust
the burner if necessary
Once combustion is set, tighten all fasteners on air
band, air shutter and head adjusting plate or es-
cutcheon plate.
Burner equipped with cover - Reinstall the cover
and repeat Steps 2 and 4 above. If CO2 increases
(O
2 decreases), remove the cover and adjust the
air setting so the CO2 (O2) with cover on meets
requirements of Step 3.
Start and stop the burner several times to ensure
satisfactory operation. Test the primary control and
all other appliance safety controls to verify that they
function according to the manufacturer’s specifi ca-
tions.
y
y
6.
1.
2.
y
y
y
3.
•
•
4.
5.
6.
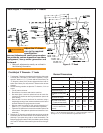
Open the shutoff valves in the oil supply line to the
burner.
Close air band and partially open air shutter. This
is an initial air setting for the pump bleeding pro-
cedure only. Additional adjustments must be made
with instruments.
Set the thermostat substantially above room tem-
perature.
Close the line voltage switch to start the burner.
If the burner does not start immediately you may
have to reset the safety switch of the burner pri-
mary control.
Bleed air from fuel unit as soon as burner motor
starts rotating.
To bleed the fuel unit, attach a clear plastic hose
over the vent fi tting. Loosen the fi tting and catch
the oil in an empty container. Tighten the fi tting
when all air has been purged from the oil supply
system.
If the burner locks out on safety during bleeding,
reset the safety switch and complete the bleed-
ing procedure. Note — Electronic safety switches
can be reset immediately; others may require a
three- to fi ve-minute wait.
If burner stops after fl ame is established, addi-
tional bleeding is probably required. Repeat the
bleeding procedure until the pump is primed and
a fl ame is established when the vent fi tting is
closed.
1.
2.
3.
4.
5.
y
y
y
Do not attempt to start the burner when excess oil
has accumulated in the appliance, the appliance
is full of vapor, or when the combustion chamber
is very hot.
Do not attempt to re-establish fl ame with the
burner running if the fl ame becomes extinguished
during start-up, venting, or adjustment.
Vapor-Filled Appliance: Allow the unit to cool off
and all vapors to dissipate before attempting an-
other start.
Oil-Flooded Appliance: Shut off the electrical
power and the oil supply to the burner and then
clear all accumulated oil before continuing.
If the condition still appears unsafe, contact the
Fire Department. Carefully follow their directions.
Keep a fi re extinguisher nearby and ready for
use.
y
y
y
y
y
y
Failure to follow these instructions
could lead to equipment malfunc-
tion and result in heavy smoke
emission, soot-up, hot gas puff-
back, fi re and asphyxiation hazards.
WARNING
!
Explosion and Fire Hazard