


Waterford TARA T25 Direct Vent Freestanding Gas Stove
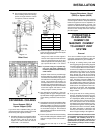
27
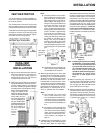
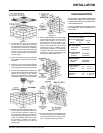
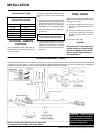
OPTIONAL WALL
THERMOSTAT
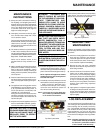
A wall thermostat may be installed if desired.
Connect the wires as per the wiring diagrams.
Note that the wires are connected to the "TH"
on the gas valve. Use table on page 27 to
determine the maximum wire length:
Note: Preferable if the thermostat is in-
stalled on an interior wall.
Waterford offers an optional programmable
thermostat but any 250-750 millivolt rated non-
anticipator type thermostat that is CSA, ULC or
UL approved may be used.
CAUTION
Do not connect the millivolt wall
thermostat wires to the 120V wires.
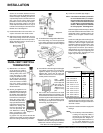
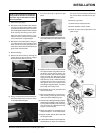
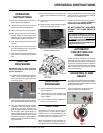
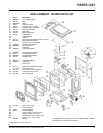
Note: Do not force logs down.
LOG INSTALLATION
WARNING: Dangerous operating con-
ditions may occur if these logs are not
positioned in their approved locations.
Read the instructions below carefully
and refer to the diagrams. If logs are
broken do not use the unit until they are
replaced. Broken logs can interfere
with the pilot and burner operation.
There are 5 logs in the set: 1 Rear Log, 1 Front
Log, 1 Middle Log and 2 Top Logs.
The logs are fragile, handle with care - DO NOT
FORCE into position.
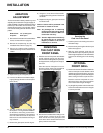
1) Remove the Cast Iron Front Panel (see page
26).
2) Remove the Front Glass Panel and frame
(see page 26.)
3) Place the rear log on the 2 rear pins in the
log support tray.
5) Place the middle log on the 2 middle log pins.
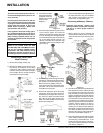
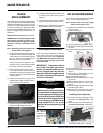
INSTALLATION
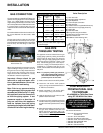
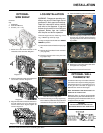
OPTIONAL
SIDE SHELF
Contents:
Qty.
1 Side Shelf
2 Side Shelf Bracket
4 Screws (1/4" x 1/2")
Diagram 2
Diagram 3
Diagram 1
1) Screw the 2 side shelf brackets to the
underside of the stove hob. Diagram 1.
2) Place the side shelf onto the 2 brackets and
secure with 2 screws. Diagram 2.
3) Align the side shelf so that it is centered on
the hob making sure not to damage the
enamel finish. Once aligned, tighten all
screws. Diagram 3.
4) Place the front log on the log support tray.
Ensure that it is pulled all the way to the front
and towards the right side of the firebox.
6) Place the 2 top logs in position on the middle
and rear logs as shown below. Place the
right log as close to the knot on the rear log
as possible.
7) Replace the Front Glass Panel and frame
and tighten the fixing bolts.
8) Replace the Cast Iron Front Panel.